A Pro Guide to Copper Pipe Insulation in the UAE
In the unique climate of the UAE, treating copper pipe insulation as anything less than essential is a serious oversight. Leaving your copper pipes exposed isn't just a minor issue; it's a direct invitation for energy waste and the kind of expensive water damage that comes from unchecked condensation. Honestly, it's one of the simplest, most effective steps you can take to protect your property and cut down on those ever-climbing utility bills.
Why Insulating Copper Pipes Is a Necessity in the UAE
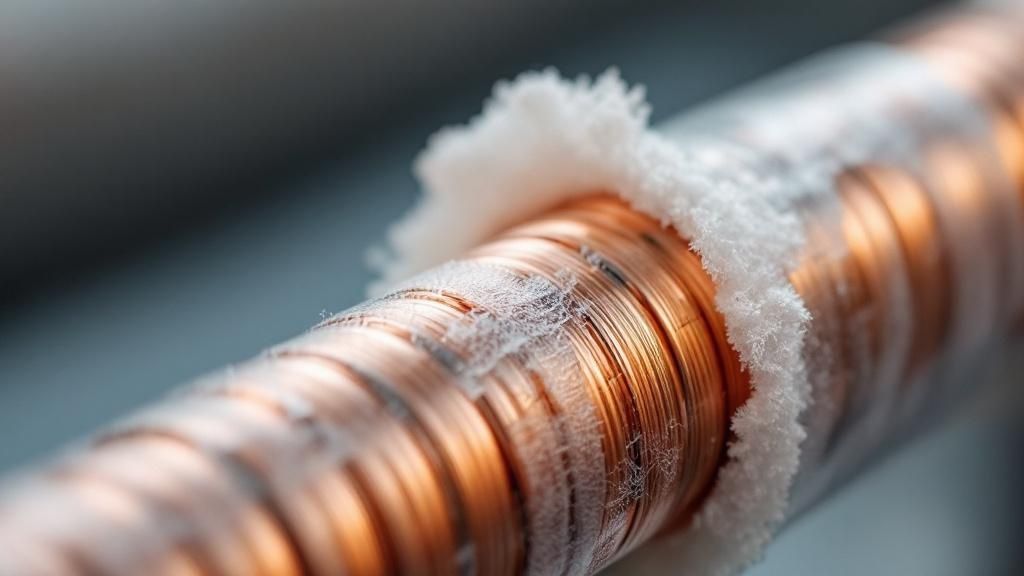
Picture this: you've got an uninsulated pipe carrying chilled water for your AC, running through a wall during a sweltering UAE summer. It's exactly like holding an ice-cold drink outside—moisture beads up on the surface almost instantly. Now, imagine that happening 24/7 inside your walls, ceilings, and service closets. This constant "pipe sweating" is a huge headache for buildings all across the region.
And we're not talking about a small inconvenience here. This is a fast track to some pretty serious structural problems. All that moisture creates the perfect environment for mould and mildew to thrive, which tanks your indoor air quality and starts to rot surrounding materials like drywall, wood, and ceiling tiles. Give it enough time, and you're looking at corroded pipes and water damage that requires costly, disruptive repairs.
The Two Biggest Risks of Uninsulated Pipes
When you get right down to it, the argument for insulating your copper pipes in the UAE boils down to stopping two major issues in their tracks: runaway condensation and massive energy loss. Both of these hit you directly in the wallet, whether you're a homeowner, a building manager, or a business owner.
- Unchecked Condensation and Water Damage: Your cold water and AC lines are the biggest culprits. The huge temperature difference between the frigid pipe and the hot, humid air creates a constant film of condensation. This water has to go somewhere, and it usually ends up dripping down, soaking insulation, staining ceilings, and weakening the building's structure.
- Significant Energy Inefficiency: An uninsulated pipe is in a constant battle with its surroundings. A hot water pipe radiates its heat out into the cooler air, forcing your water heater to fire up more often just to keep up. On the flip side, AC refrigerant lines absorb heat from the hot environment, making your system work much harder to cool your space and sending your electricity bill through the roof.
An uninsulated pipe is like leaving your car's AC running with the windows down in the middle of July—it’s fighting a losing battle against the environment, wasting energy and money every second.
A Smart Investment, Not an Optional Expense
To understand the core benefits at a glance, consider how insulation impacts both hot and cold systems.
Core Benefits of Insulating Copper Pipes in Hot Climates
| Benefit Category | Impact on Cold Water & AC Lines | Impact on Hot Water Lines |
|---|---|---|
| Energy Efficiency | Reduces heat gain, improving AC performance and lowering electricity costs. | Minimises heat loss, reducing the workload on water heaters and saving on fuel/electricity. |
| Damage Prevention | Prevents condensation ("sweating"), protecting against water damage, mould, and corrosion. | Keeps pipes from freezing in rare cold snaps (less common but still a risk in some areas). |
| System Longevity | Reduces strain on HVAC components, extending the lifespan of compressors and air handlers. | Decreases the operational time of the water heater, prolonging its service life. |
| Financial Savings | Lowers monthly utility bills and prevents expensive repairs related to water damage. | Reduces energy consumption and avoids the cost of premature equipment replacement. |
This table clearly shows that insulation isn't just about one thing; it’s a comprehensive solution that protects your entire plumbing and HVAC infrastructure.
The growing awareness of these benefits is plain to see in market trends. The pipe insulation market in the Middle East and Africa was valued at USD 79.43 million in 2022 and is set for major growth. This isn't surprising; it's driven by the urgent need for energy efficiency in the region’s fast-growing construction sector.
Ultimately, a good layer of pipe insulation is a critical barrier. It keeps your cold pipes from sweating and your hot pipes from losing their heat. This simple, effective layer ensures your systems run the way they were designed to, protecting your property's value and delivering real, measurable savings on your bills. While we're focused on copper pipes in the UAE, you can learn more about the importance of professional pipe insulation in general. And remember, using top-tier products is crucial, so be sure to familiarise yourself with the local building materials quality standards in the UAE.
Choosing the Right Insulation Material for Your Project
Picking the right material for your copper pipe insulation is probably the most critical decision you'll make for the entire project. It's the one thing that determines whether an installation provides years of trouble-free performance or fails within a single, brutal summer. The options can seem a bit overwhelming, but when you know what to look for in the UAE's demanding climate, the choice becomes much clearer.
This isn't just about grabbing any insulation off the shelf. It’s about a careful match between the material's properties and the specific job you need it to do. You really need to zero in on its thermal efficiency (that’s the R-value), how well it stands up to moisture, and its durability against the elements—especially UV rays for any pipes exposed to the sun.
Think about it this way: insulating an AC coolant line on a sun-baked rooftop requires something completely different from what you'd use for a hot water pipe tucked safely inside a wall. Get it wrong, and you could end up overspending on features you don't need or, even worse, leaving your system vulnerable where it needs protection the most.
The Top Insulation Contenders
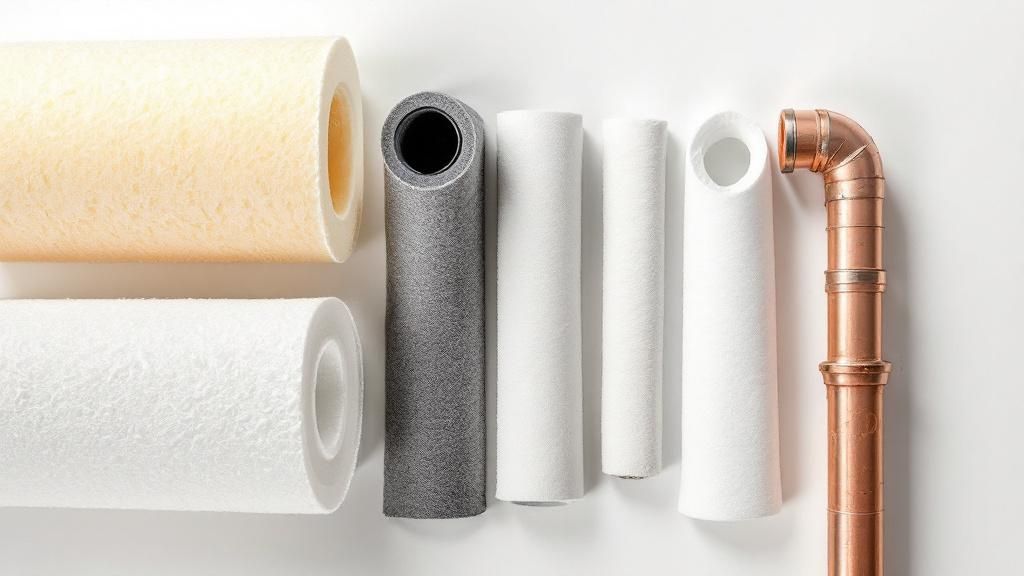
When you start looking at insulation options for copper pipes, you'll find that a few key players come up again and again. That's because they've proven their worth. Each has its own set of strengths, making it the perfect fit for certain situations.
Elastomeric Foam (Nitrile Rubber): This is a super-flexible, closed-cell foam insulation. Its very structure is what makes it a champion against moisture and water vapour—a huge plus for stopping condensation dead in its tracks on chilled water and AC lines.
Polyethylene Foam: A very common and budget-friendly choice, polyethylene is a lightweight, closed-cell material. It’s easy to work with and provides good thermal insulation, which is why you see it so often on residential hot and cold water pipes.
Fibreglass: Made from finely woven glass fibres, fibreglass is the heavyweight champion of high-temperature applications. With excellent thermal resistance, it's often the first choice for high-heat industrial lines and hot water systems, partly because it's also fire-resistant.
Comparison of Common Copper Pipe Insulation Materials
To make the best call for your project here in the UAE, you have to see how these materials stack up against our local conditions. The combination of intense heat, high humidity, and powerful sunlight will push any material to its breaking point.
This table breaks down the essentials to help you compare them side-by-side.
| Material Type | Typical R-Value (per inch) | Moisture Resistance | Best For | Considerations |
|---|---|---|---|---|
| Elastomeric Foam | R-3 to R-4 | Excellent | AC coolant lines, chilled water pipes, outdoor applications (with UV coating) | Its superior moisture resistance makes it ideal for preventing condensation in humid climates. |
| Polyethylene Foam | R-2 to R-3 | Good | Indoor hot and cold water lines, DIY projects. | Most budget-friendly option, but can degrade under direct sunlight without protection. |
| Fibreglass | R-4 to R-5 | Poor (if exposed) | High-temperature hot water pipes, industrial process lines. | Requires a protective outer jacket to prevent moisture from compromising its R-value. |
As you can see, there’s no single "best" material—just the best one for a specific job. Making the right selection is a fundamental step, and you can explore more about how to choose reliable construction materials for the UAE climate in our other guide.
This careful selection process is part of a larger trend. The market for pre-insulated pipes in the Middle East and Africa is expected to grow from USD 1.23 billion in 2025 to USD 2.48 billion by 2031. This explosive growth is fuelled by expanding district cooling networks and tougher energy efficiency standards.
At the end of the day, your goal is to wrap your copper pipes in a seamless, protective barrier. The right material ensures that this barrier will stand firm against condensation, heat transfer, and physical wear and tear, protecting your investment for years to come.
How Insulation Thickness and R-Value Impact Performance
When you’re looking at copper pipe insulation, it's easy to get bogged down in technical jargon like "thickness" and "R-value." Let's break these down in simple terms. Think of R-value as the insulation's "blocking power"—its ability to stop heat from passing through. The higher the R-value, the better it is at its job.
But here’s where a lot of people go wrong: success isn't just about grabbing the product with the highest R-value off the shelf. It’s about matching the right R-value and thickness to the specific application. A one-size-fits-all approach is a recipe for failure, especially in a place like the UAE where we're constantly battling extreme heat and humidity.
The real goal is to create a barrier that not only stops energy loss but, just as crucially, prevents condensation from forming on the pipe's surface. This demands a bit more thought than just picking the thickest or cheapest option available.
Understanding R-Value and Its Importance
The R-value of an insulation material is simply a measure of its thermal resistance. It’s like choosing between a thin cotton sheet and a thick wool blanket to stay warm on a cold night. The wool blanket, with its superior ability to trap heat, has a much higher R-value.
In the world of pipe insulation, this means a material with a higher R-value is better at keeping hot water hot and chilled water cold. For example, fibreglass insulation often has a high R-value of around R-4 to R-5 per inch, which makes it a fantastic choice for high-temperature hot water pipes. This translates directly into energy savings because your water heater or chiller doesn’t have to work nearly as hard.
The R-value isn't just a number on a spec sheet; it's a direct indicator of how well the insulation will perform its core function. A higher R-value slows down heat transfer, which is the key to both energy efficiency and condensation control.
Why Thickness Is Not the Whole Story
While the R-value tells you the material's insulating capability, the thickness is what puts that capability into action. The total insulating power you get is the material's R-value per inch multiplied by how thick it is. So, in theory, doubling the thickness doubles the overall protection.
However, just opting for the thickest insulation you can find isn't always the smartest move. The ideal thickness really depends on a few critical factors working together.
- Pipe Diameter: Bigger pipes have more surface area, so they lose or gain heat much faster. They naturally need thicker insulation to get the same level of performance as a smaller pipe.
- Fluid Temperature: The bigger the temperature difference between what's inside the pipe and the air outside, the thicker the insulation needs to be. Think about an ice-cold AC coolant line running through a non-air-conditioned space that's 45°C. It needs a much beefier protective layer than a simple domestic cold water line.
- Ambient Humidity: This is a huge one for us in the UAE. High humidity means you need thicker insulation to keep the outer surface of the insulation above the dew point—the temperature where moisture in the air turns into condensation.
Matching Thickness to the Application
Let's walk through a real-world example. For a standard hot water pipe inside a home, a 13mm (1/2 inch) thick polyethylene foam insulation might be all you need. Its main job is to reduce heat loss, and the indoor conditions are fairly stable.
Now, picture a chilled water pipe for an AC system that runs through a hot, unconditioned plant room. The risk of condensation here is massive. For this job, you'd need a much thicker, closed-cell elastomeric foam insulation—something like 25mm (1 inch) or even 32mm (1 1/4 inch)—to stop the pipe from "sweating" and causing water damage.
Getting the thickness wrong for the specific conditions is a common mistake that completely undermines the whole point of insulating. It leads to a system that fails to save energy or prevent condensation, turning what should have been a smart investment into a complete waste of effort.
A Step-by-Step Guide to a Flawless Installation
Getting copper pipe insulation right isn't about having superhuman skills—it's all about paying close attention to the details. When you do it properly, you create a seamless, airtight barrier that works exactly like it's supposed to. Let's walk through the process, breaking it down into simple, manageable steps. This will turn what seems like a complex job into something straightforward, giving you a professional-grade result that lasts.
Think of your goal this way: you need to eliminate every single path for humid air to touch the cold pipe. Even a tiny, pinhole-sized gap can sabotage the entire setup, leading to condensation, wasted energy, and eventually, total failure. It’s a bit like waterproofing a boat; one small leak can cause massive problems down the line.
Preparing for a Successful Installation
Before you even think about cutting a piece of insulation, good prep work is non-negotiable. A clean, smooth pipe surface is what allows the insulation to fit snugly and helps adhesives and tapes form a permanent bond. A lot of people rush this part, and it's a classic mistake that can undermine the entire project.
Start by getting your tools and safety gear in order. Having everything within arm's reach from the get-go saves you from stopping and starting, and it keeps the whole process safe and efficient.
Your Essential Toolkit:
- Safety Glasses: A must-have for protecting your eyes from dust or stray bits of material.
- Gloves: Protect your hands from sticky adhesives and any sharp edges.
- Sharp Utility Knife or Insulation Knife: A sharp blade is crucial for clean, precise cuts. A dull one will just tear the material.
- Measuring Tape: Accuracy is everything here. You need a tight fit.
- Appropriate Adhesive: Always use the contact adhesive recommended by the insulation manufacturer.
- Insulation Sealing Tape: This is for covering all your seams and joints to create that all-important vapour barrier.
Once your tools are laid out, give those copper pipes a thorough cleaning. Just wipe them down with a clean, dry cloth to get rid of any dust, grease, or moisture. A perfectly clean surface is the foundation for a tight fit and a solid adhesive bond.
Executing the Perfect Installation
With clean pipes and your tools ready, it's time for the main event. Follow these steps methodically, and you'll create a perfect, airtight seal around every centimetre of pipework.
Measure with Precision: Measure the length of the straight pipe section you're covering. When you get to fittings like elbows and tees, measure carefully along the outside curve to figure out the exact amount of material you'll need. Always measure twice, cut once.
Cut Cleanly: Lay the insulation on a flat, stable surface. Use your sharp knife to make straight, clean cuts. Try to avoid a sawing motion, as that creates ragged edges that are a nightmare to seal properly. For the angled cuts you'll need for bends, a mitre box is a fantastic tool to have.
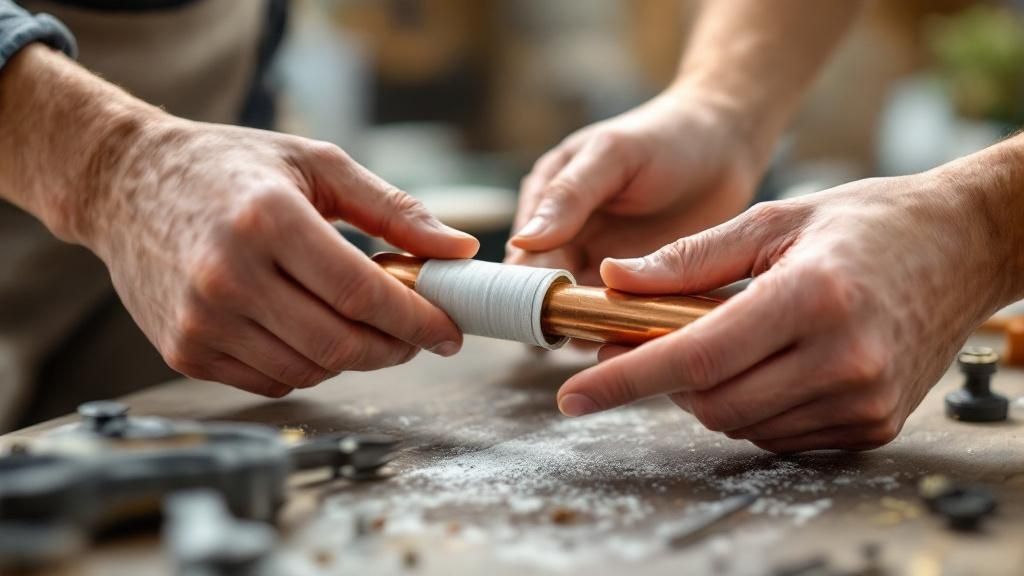
Position and Fit: If you're using slit tubular insulation, just open the slit and snap it right over the pipe. You want it to be snug, but not compressed or stretched tight, as that actually reduces its R-value.
Seal the Seams: This is probably the most critical part of the whole job. Apply the recommended contact adhesive to both sides of the long slit. Let it get tacky for a moment (as per the instructions), and then press the seam firmly together from end to end.
Secure Every Joint: Wherever two pieces of insulation meet, apply adhesive to both ends and press them together. You're aiming for a tight butt joint with absolutely no visible gaps.
Tape for Total Protection: Now, cover every single seam—both the long slits and the butt joints—with the right finishing tape. This tape is your final, critical line of defence against moisture getting in.
Remember, the integrity of your insulation system is only as strong as its weakest point. A single unsealed joint is an open invitation for humid air to get in and compromise the entire installation.
The growing demand for solid, reliable infrastructure really underscores why these best practices are so important. In fact, the copper pipes market in the Middle East and Africa is expected to climb from USD 263 million to USD 329.7 million by 2030. This boom is tied directly to the increase in construction, where high-performance insulation is absolutely essential for energy efficiency in our hot climate. You can explore the trends in the regional copper pipe market in more detail.
Investing the time to do the installation right pays for itself surprisingly quickly. This infographic shows a typical return on investment.
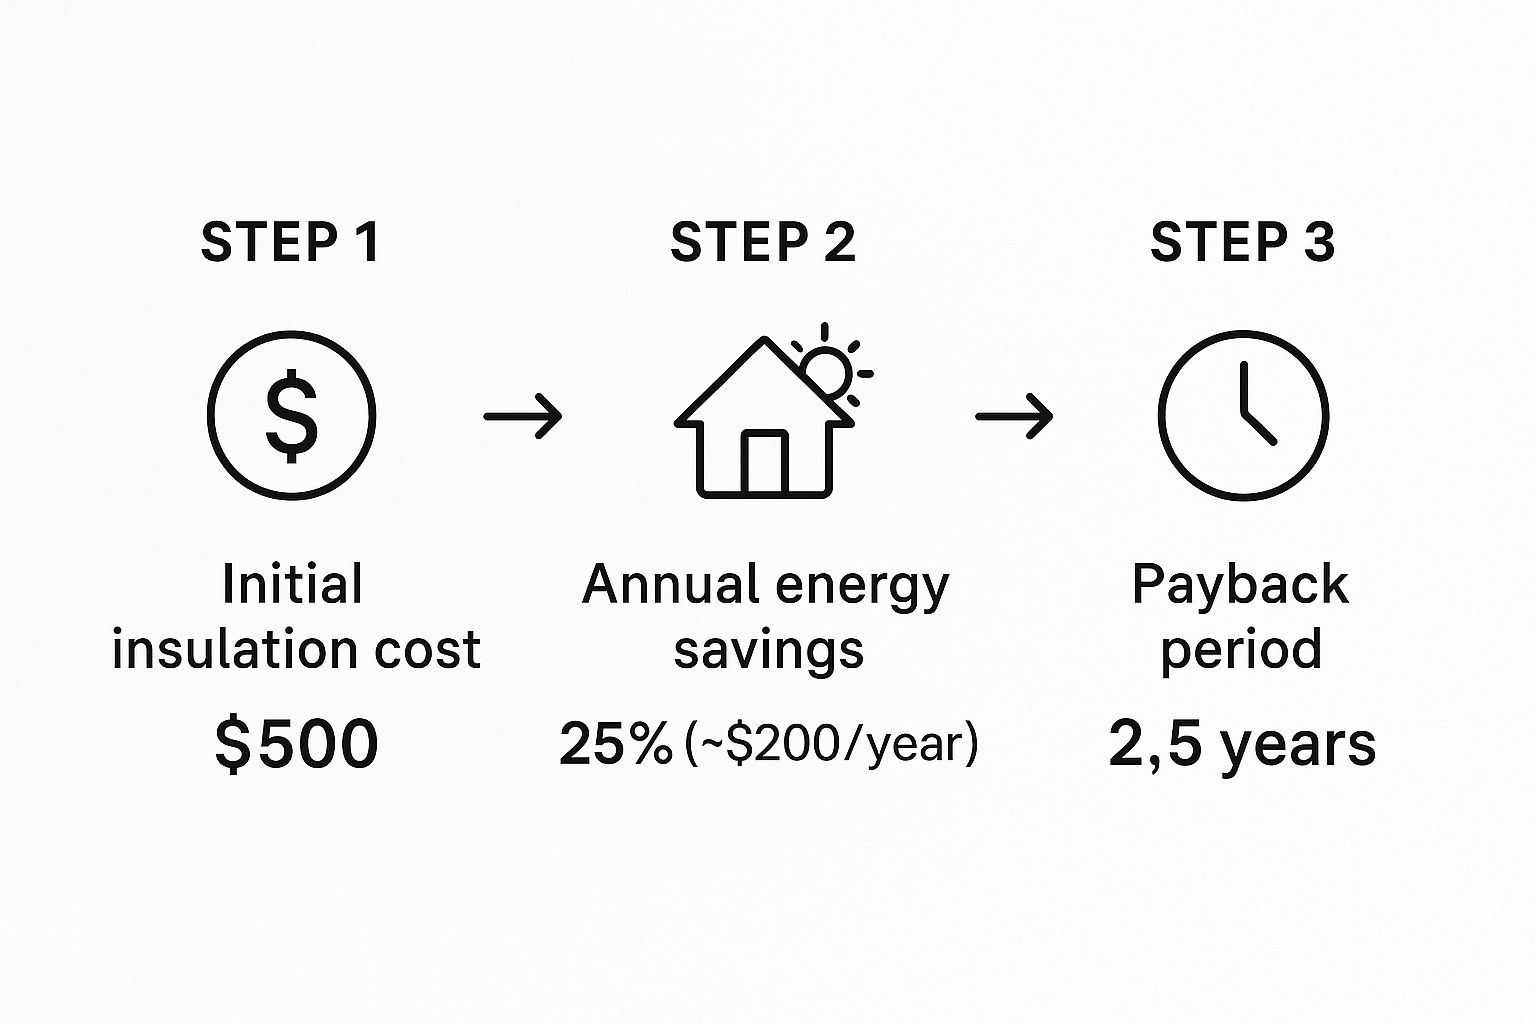
As you can see, the initial outlay can often be recovered in just a couple of years, thanks to the significant annual savings on energy bills.
Here is the rewritten section, crafted to sound like an experienced human expert while adhering to all your requirements.
Common Installation Mistakes and How to Avoid Them
You can choose the absolute best materials for your copper pipe insulation project, but a few simple installation mistakes can render it all useless. It's a frustratingly common story. These slip-ups often seem small at the moment, but they open the door to condensation, massive energy waste, and, eventually, costly system failures.
Think of it this way: learning from these common pitfalls is like having a seasoned technician looking over your shoulder. You get the benefit of their hard-won experience, helping you sidestep the issues that can completely undermine your insulation's performance. The goal is a continuous, unbroken shield around your pipes. Any gap, no matter how tiny, is a critical failure point.
Overlooking Small Gaps and Imperfect Seams
This is, without a doubt, the single most frequent and damaging mistake I see in the field. Installers, often in a hurry, leave tiny, almost invisible gaps, especially around tricky fittings like elbows, tees, and valves. The assumption is that a small opening won't matter much. In the relentless humidity of the UAE, that assumption is dead wrong.
Humid air is opportunistic. It will find any exposed path to a cold pipe surface, and the moment it makes contact, it condenses. This moisture then gets trapped, soaking the insulation from the inside out. Not only does this destroy the material's R-value, but it also creates a hidden, damp environment perfect for mould growth.
An unsealed seam on pipe insulation is like a small leak in a boat. It might not look like much at first, but it will eventually sink the entire vessel. Your vapour barrier must be 100% continuous to be effective.
So, how do you prevent it? Be meticulous. Use the manufacturer-specified contact adhesive on every single seam and butt joint. Don't stop there. Follow up by sealing all those joints with the correct finishing tape. This two-step process creates a final, impenetrable vapour barrier that moisture can't beat.
Compressing the Insulation Material
Here’s another classic error: stretching or squashing the insulation to make it fit a tight spot. It might seem like a clever shortcut, but you're actually destroying the very properties that make the insulation work. Materials like foam and fibreglass depend on millions of tiny trapped air pockets to stop heat transfer.
When you compress the material, you squeeze those air pockets out. This drastically lowers its R-value, turning that section into a thermal bridge—a highway for heat to pass through. That spot is now primed for condensation and becomes a major point of energy loss.
The fix is simple: always cut the insulation to the correct size. It should fit snugly around the pipe, like a tailored glove, but never be forced, stretched, or compressed into place.
Using the Wrong Adhesive
Don't just grab any old glue from the toolbox. Using a generic adhesive instead of the contact cement specifically formulated for your insulation is a surefire way to have it fail. Many general-purpose glues simply can't create a lasting bond with foam or rubber surfaces and will degrade quickly under the temperature swings of hot and cold water pipes.
When the adhesive gives way, your seams open up. This immediately breaks that all-important vapour seal, letting moisture in and kicking off a cascade of problems.
- Always read the manufacturer's data sheet. Use only the adhesive they recommend for your specific insulation type.
- Check the temperature ratings. Make sure the glue can handle the operating temperatures of both your chilled and hot water lines.
- Apply it correctly. Follow the instructions on application and curing time to the letter. This ensures you get a permanent, reliable bond.
By sidestepping these fundamental mistakes, you’re ensuring your insulation system works exactly as intended, protecting your copper pipes and locking in energy efficiency for years to come.
Maintaining Insulation for Peak Long-Term Efficiency
Getting your copper pipe insulation installed correctly is a massive win, but don't close the book on it just yet. To make sure that investment keeps paying you back in energy savings and property protection for years, you need a simple long-term care plan. The good news? It’s incredibly straightforward, mostly involving occasional check-ups to spot little issues before they snowball.
Think of it like getting your car serviced. A bit of regular attention ensures everything runs smoothly and helps you avoid a costly breakdown down the road. This proactive mindset is the cornerstone of smart building management, treating your insulation system as the critical asset it is.
Your Simple Inspection Checklist
Every so often, just take a walk along your insulated pipe runs. This is genuinely the most effective maintenance you can do. You don’t need any fancy equipment—just your eyes and a sense for what looks out of place. This small time commitment can literally save you a fortune in future energy waste and repairs.
Keep an eye out for these common signs of trouble:
- Cracks, Tears, or Punctures: Physical damage is the most obvious red flag. Any tear in the insulation or its outer jacket is an open invitation for moisture.
- Failing Seals or Open Seams: Take a close look at the joints where two pieces of insulation meet. If the adhesive is failing or the tape is peeling back, your vapour barrier is compromised.
- Signs of Pest Damage: Birds and rodents can sometimes chew or nest in insulation, creating massive gaps in coverage, especially in outdoor or less-frequented areas.
- Compression or Sagging: If the insulation looks crushed or is drooping off the pipe, its R-value is shot. It’s no longer doing its job effectively.
- Visible Moisture or Staining: Any damp spots or discolouration are a huge warning sign. It means condensation is already forming, either on the surface or, even worse, underneath.
Making Straightforward Repairs
The best part is that most of these minor issues are easy to fix if you catch them early. Patching a small tear is a world away from replacing an entire section of pipe ruined by water damage. This is a core concept in all property upkeep, which we explore further in our guide to what is preventive maintenance.
The goal of maintenance isn’t just to fix what’s broken; it’s to preserve the integrity of the entire system. A small, timely repair on your pipe insulation maintains the continuous thermal and vapour barrier that is essential for its performance.
If you spot a problem, here’s how to handle it:
- Patching Small Tears: For a minor rip, you can usually fix it with the manufacturer-recommended sealing tape. Just make sure the surface is clean and dry, then apply the tape, pressing it down firmly to create a new, tough seal.
- Resealing Open Joints: If a seam has split open, carefully re-apply the correct contact adhesive to both edges. Press them together firmly, hold them until they bond, and then cover the seam with finishing tape for an extra layer of durable protection.
By adopting this simple inspect-and-repair mindset, you're guaranteeing your copper pipe insulation performs at its best for its entire lifespan. This minimal effort ensures the energy savings and property protection you invested in will continue to pay dividends, year after year.
Your Top Pipe Insulation Questions Answered
Even with a good grasp of the benefits and how-to's of copper pipe insulation, you probably still have a few questions. That’s perfectly normal. Getting straight answers to these common queries is often the last step before you can confidently tackle your project and get it right the first time.
Let's dive into the questions we hear most often from professionals and homeowners right here in the UAE.
Is It Really Worth the Cost to Insulate Pipes in the UAE?
Without a doubt. If you look at it purely from a cost-benefit angle, the initial outlay for materials is a drop in the bucket compared to what you’ll save down the line. You'll notice a real difference in your utility bills when your AC and water heater aren't constantly battling the ambient heat just to keep up.
But the real value goes beyond savings. Proper insulation is your first line of defence against the enormous cost of water damage and mould remediation. In the UAE's humidity, "pipe sweating" isn't a minor annoyance—it's a major threat that can rot drywall and compromise your building's structure. Think of insulation less as an upgrade and more as a critical protective investment.
Do I Need to Insulate Both Hot and Cold Water Pipes?
Yes, absolutely—and for different, but equally important, reasons. Insulating cold water and AC lines is all about preventing condensation. This simple step stops moisture from forming, which in turn protects your walls, ceilings, and the pipes themselves from dampness, damage, and rust.
With hot water lines, the goal is to stop heat from escaping as water travels from the heater to your tap. This means you get hot water faster and your heater doesn't have to work as hard, which directly cuts down on energy use. For a truly efficient and protected system, insulating both is the only way to go. It's what the pros do.
Can I Install Copper Pipe Insulation Myself?
If you're dealing with straight, easy-to-reach pipes, a skilled DIYer can definitely get the job done well. As long as you follow a detailed guide (like the one in this article) and take your time, the process for simple runs isn't too complicated.
That said, if your system has a lot of bends, complex fittings, or pipes tucked away in tight spaces, it's wise to call in a professional. Getting that perfect, unbroken vapour seal—which is absolutely essential for AC lines—takes a level of skill that comes with experience. It’s the only way to ensure the insulation performs correctly for years to come.
What Happens If I Don’t Seal the Seams Properly?
Poorly sealed seams are the number one reason insulation jobs fail. A tiny gap is all it takes for humid air to sneak in and find the cold surface of the pipe. Once that happens, the moisture condenses into water and gets trapped inside the insulation.
This trapped moisture kicks off a whole chain of problems:
- The copper pipe starts corroding, completely hidden from view.
- Mould and mildew begin to grow inside the insulation material.
- The insulation becomes waterlogged and loses all of its R-value.
Ultimately, a bad seal makes the entire job pointless. It’s a small detail that makes all the difference.
For all your projects, from large-scale developments to routine maintenance, trust Yasu Trading Co. LLC to provide the highest quality building materials, plumbing fittings, and HVAC components. We supply premium copper pipe insulation and all the necessary accessories to ensure a professional, long-lasting installation.
Request a quote today for your construction and maintenance needs.