
Mastering HVAC Unit Installation
A successful hvac unit installation is all about the prep work. It’s not just about turning wrenches and connecting wires; it's about laying the groundwork that guarantees your system runs efficiently and keeps the space comfortable for years to come. Think of it as the blueprint phase—get this right, and you’ll sidestep a world of costly mistakes.
Building a Flawless HVAC Installation Blueprint
You wouldn’t start building a house without a detailed architectural plan, right? The same logic applies here. Rushing through the planning stage is a recipe for disaster. It leads to a whole cascade of problems, from an overworked system and shocking energy bills to a unit that dies long before its time.
A solid plan, on the other hand, is your ticket to a smooth installation and reliable performance. This is especially true here in the UAE, where a high-functioning HVAC system isn't just a comfort—it's an absolute necessity.
The first thing you absolutely have to get right is the load calculation. Guesswork is your worst enemy in HVAC. You need to run the numbers using a proper industry standard like the Manual J calculation to figure out the precise cooling and heating load the building actually needs.
This isn’t just about square footage. A professional load calculation digs into the details:
- Building Size and Layout: The total volume of air that needs conditioning, not just the floor area.
- Insulation Quality: The R-value of the walls, ceilings, and floors which dictates how well the building holds temperature.
- Window Specifications: The number, size, type, and even the direction your windows face. A south-facing wall of glass is a very different challenge than a shaded north-facing one.
- Air Infiltration: How much unconditioned air is sneaking in through tiny gaps and cracks.
- Occupancy and Usage: The number of people regularly inside and the heat thrown off by appliances and equipment.
Without this data, you’re just guessing at the unit size. Go too big, and the system will “short-cycle”—blasting cold air and shutting off before it has a chance to pull humidity out of the air. The result? A cold, clammy, and uncomfortable space. Go too small, and the unit will run non-stop, desperately trying to keep up, which skyrockets your energy use and puts a ton of stress on the components.
Choosing the Right HVAC System
Once you have that magic number—the required capacity—you can start looking at the right type of system. This decision really comes down to the building itself, your budget, and what you need the system to do.
- Split Systems: These are what you see in most homes. They have an outdoor unit with the condenser and compressor, and an indoor unit that handles the air. They’re a fantastic, versatile choice for single-family homes and smaller commercial spots.
- Package Units: Think of these as an all-in-one solution. Every component is housed in a single cabinet that usually sits on the roof or on a concrete slab outside. They’re perfect for commercial buildings with no extra indoor space or houses without basements.
- Variable Refrigerant Flow (VRF) Systems: This is the more advanced option, ideal for large buildings with multiple zones, like an office tower or a hotel. One powerful outdoor unit can serve many indoor units, and each one can be controlled separately.
The market definitely reflects these choices. The Middle East and Africa HVAC market hit USD 9.45 billion in 2023 and is still climbing. A lot of that growth is thanks to the popularity of high-efficiency split systems and the big push for VRF technology in the region’s many high-rise projects. You can read more about the regional HVAC market growth on psmarketresearch.com.
Before you make a final decision, it helps to see how these systems stack up against each other for our specific climate.
Choosing Your HVAC System for UAE Climates
This table compares the most common HVAC system types to help you select the best fit for your property based on key factors like cost, efficiency, and ideal application.
| System Type | Best For | Installation Complexity | Upfront Cost | Energy Efficiency |
|---|---|---|---|---|
| Split System | Villas, townhouses, smaller offices | Moderate | $$ | Good to Excellent |
| Package Unit | Retail outlets, low-rise commercial, homes with no indoor space | Low to Moderate | $$$ | Good |
| VRF System | High-rise buildings, hotels, large multi-zone properties | High | $$$$ | Excellent |
Ultimately, picking the right system is about understanding the real-world application and matching the technology to the unique demands of the property.
Key Takeaway: The selection process isn't just about brand names; it's about matching the technology to the application. For a sprawling villa in Dubai, a high-efficiency split system or even a VRF might be ideal. For a compact commercial outlet, a rooftop package unit could be the most practical solution.
Navigating Codes and Permits
Finally, no blueprint is complete until you’ve sorted out the paperwork. Every single HVAC unit installation has to comply with local building codes and safety standards.
Before you even think about starting the work, you have to get the right permits from the local authorities. This isn't an optional step you can skip to save time. It's a critical process that ensures your installation is safe, legal, and meets all the required electrical and efficiency standards.
Trying to fly under the radar can lead to hefty fines, orders to rip the entire system out, and serious legal trouble. Always, always check with your local municipality to understand the specific requirements in your area before a single tool comes out of the truck.
Gearing Up for a Safe and Efficient Installation
With your plan locked in, it's time to get your hands dirty. The focus shifts from paperwork to the job site, where a professional hvac unit installation is all about having the right tools and a serious commitment to safety. This isn't a step you can gloss over—it’s crucial for protecting yourself, the client’s property, and the brand-new system you're about to install.
Don't even think about showing up with a basic home toolbox. That's a surefire way to cause problems down the line. This kind of work needs specialized gear built for precision. It’s also never a bad idea to review some general HVAC installation guidance to keep best practices fresh in your mind.
Assembling Your Essential Toolkit
Having the right equipment is what separates the pros from the amateurs. It’s how you guarantee every connection is tight, every measurement is spot-on, and the system runs exactly how the manufacturer designed it to. A well-organized truck is a beautiful thing.
Here’s what should absolutely be in your arsenal:
- Tube Bender and Cutter: You need this for making clean, perfect bends and cuts in copper refrigerant lines. Kinks are the enemy of proper flow.
- Flaring Tool Kit: For split systems, this is non-negotiable. It’s the only way to create the tight, leak-proof flare connections that prevent refrigerant loss.
- Manifold Gauge Set: This is your lifeline. You'll use it to check system pressures during the install and for any diagnostics later on.
- Vacuum Pump: You must pull a deep vacuum to get moisture and other junk out of the refrigerant lines before you charge the system.
- Refrigerant Scale: Guessing is for rookies. A digital scale is the only way to add the precise refrigerant charge the manufacturer calls for.
- Multimeter: Your key to electrical safety. Use it to check voltages, confirm connections, and troubleshoot any wiring gremlins.
Of course, you'll also need a solid set of hand tools—wrenches, screwdrivers, wire strippers, and a good level to make sure every unit is set perfectly straight.
Prioritising Safety on the Job Site
Let's be clear: an HVAC installation site has real dangers. We're talking high-voltage electricity and high-pressure refrigerants. Setting up a safe work area isn't just a good idea; it's the most important thing you'll do all day.
Expert Insight: Did you know that over 90% of electrical incidents on the job are preventable? Strict safety protocols like Lockout/Tagout (LOTO) aren't just suggestions. They're life-saving procedures you have to follow every single time, without exception.
Electrical safety starts with killing the power. Before you even think about touching a wire, use your multimeter to double-check that the power is off at the disconnect box and the main panel. Knowing your electrical needs is vital; our guide on understanding electrical load calculation has some great information that applies here.
Refrigerants demand just as much respect. They're stored under high pressure, and the cylinders can be incredibly dangerous if you don't handle them correctly.
- Always wear your safety glasses and gloves when you're connecting gauges or hoses.
- Make sure you have good ventilation, especially if you're brazing lines, so you don't breathe in nasty fumes.
- Never, ever heat a refrigerant cylinder with a torch or open flame.
When you bring the right tools and strict safety rules together, you create the perfect environment for a high-quality, safe, and efficient installation. This prep work is the solid foundation every successful project is built on.
Executing the Mechanical and Electrical Installation
With the blueprint finalized and the site prepped, it's time to get our hands dirty. This is where the real craftsmanship comes into play, turning detailed plans into a living, breathing HVAC system. It’s a precise dance of mechanical and electrical tasks, with each step building on the one before it to create something truly reliable.
The process kicks off with meticulous marking and measuring. You can’t just eyeball this stuff.
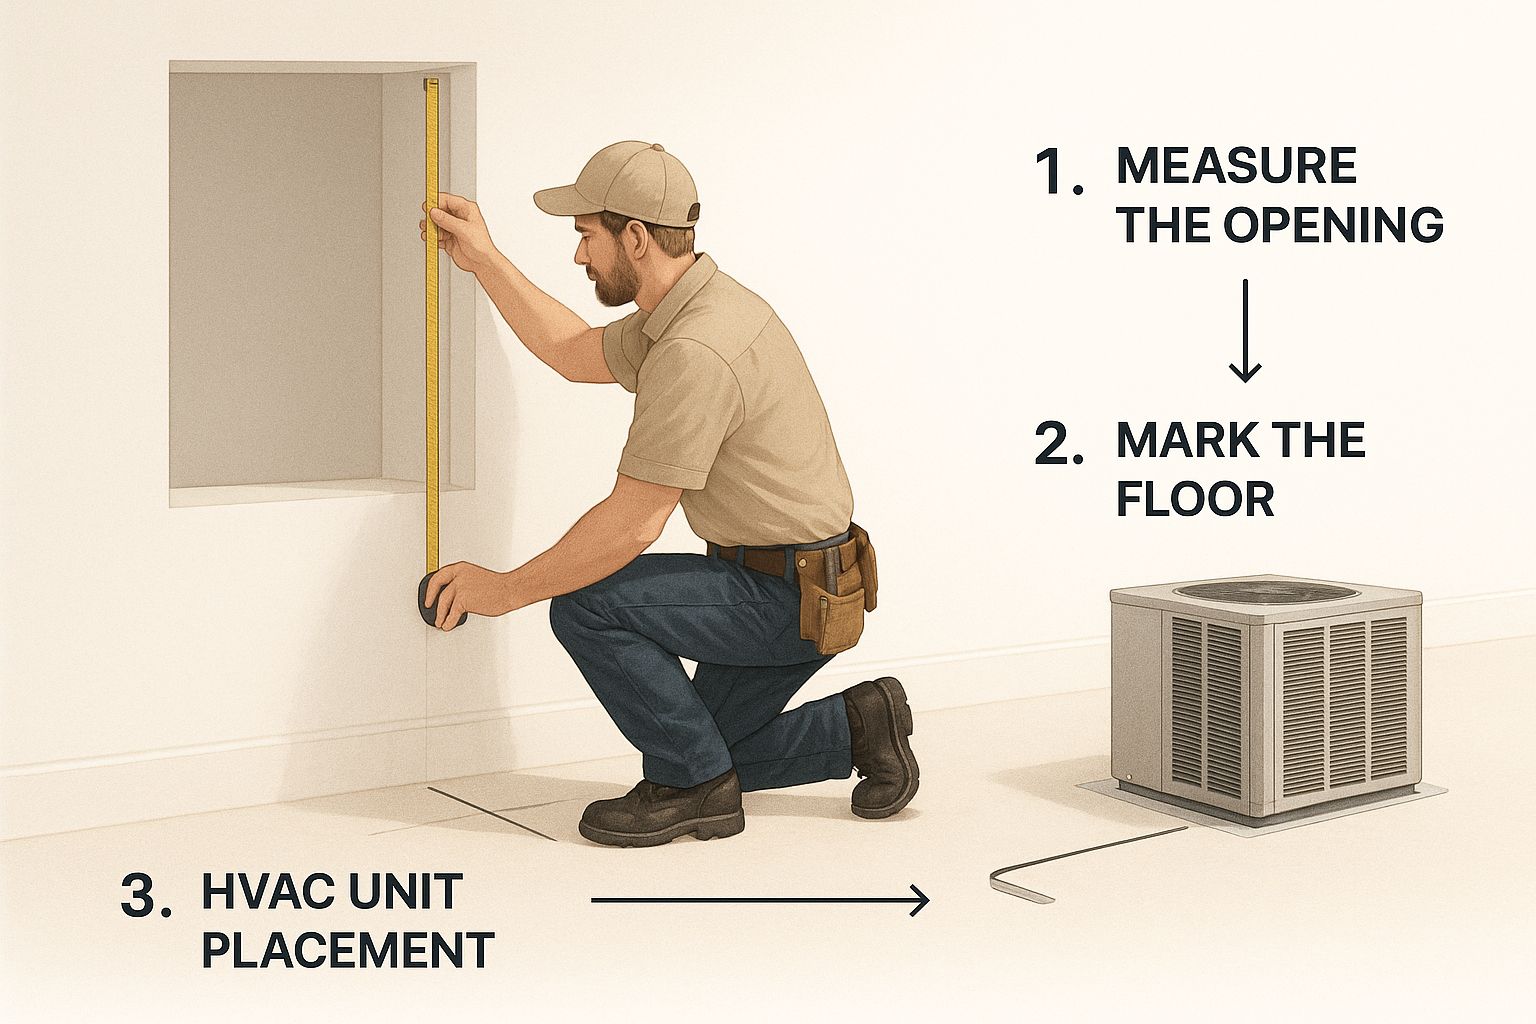
As you can see, precision from the very start is non-negotiable. Even a small placement error here can throw a wrench into the entire installation down the line.
Setting the Core Components
The first move is to position the main units. The outdoor condenser has to sit on a perfectly level pad—no exceptions. We typically use a solid composite or concrete pad and a spirit level is your best friend here. An uneven base creates vibrations that will kill your compressor and other components way ahead of their time.
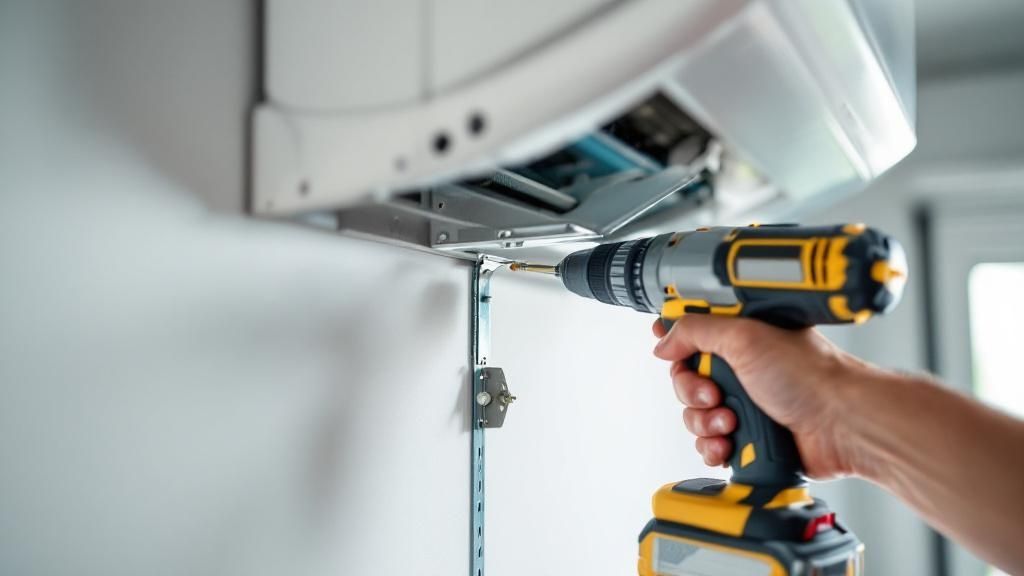
At the same time, the indoor air handler or fan coil unit needs to be mounted securely. Whether it's tucked away in a utility closet, up in the attic, or suspended from the ceiling, it has to be stable and level. This is crucial for proper condensate drainage and keeping the system running quietly.
Pro Tip: When you place that outdoor unit, think about the future technician who has to service it. Always leave at least 60 cm of clearance around the sides and top for airflow and to make maintenance a whole lot easier.
Getting this initial placement right sets the stage for everything else. For a deeper dive into local best practices, check out our guide on professional ac installation in dubai.
Running and Connecting Refrigerant Lines
Once the units are in their final homes, it’s time to build the circulatory system for the refrigerant. This means running a copper line set to connect the indoor and outdoor units, a job that demands absolute precision.
There's no room for shortcuts here:
- Cutting: Always use a dedicated tubing cutter. It gives you a clean, square cut without squashing the copper. A hacksaw is a definite no-go—it leaves metal shavings that will contaminate the whole system.
- Bending: Grab a proper tube bender to make smooth, gradual curves. If you kink the line, you restrict refrigerant flow, and that's one of the fastest ways to destroy a compressor and tank your efficiency.
- Brazing: These connections must be brazed, not soldered. The industry standard is to braze while purging nitrogen through the lines. This keeps oxidation from forming inside the pipes, which would otherwise flake off and clog up delicate parts.
Mastering a leak-proof braze is an art. A single bad joint can cause a slow refrigerant leak, killing performance over time and leading to a total system failure.
Wiring the System for Safe Operation
From a safety standpoint, the electrical work is the most critical part of the job. You're connecting the main power, the thermostat, and the communication wires between the units. Every connection has to be tight, secure, and followed to the letter of local electrical codes.
This isn't the place for guesswork. You'll be wiring the outdoor disconnect box, running the power whip to the condenser, and hooking up the low-voltage thermostat wire to the indoor unit and the thermostat itself.
While you're at it, think about smart home integration. Getting professional digital thermostat installation services is a game-changer for precise climate control and maximizing energy savings. It puts incredible control right at the homeowner's fingertips.
Installing the Condensate Drain
Last but not least, every AC unit pulls water from the air as it dehumidifies. That water has to go somewhere safe. A properly installed condensate drain is your first line of defense against water damage, mold, and costly property destruction.
The drain line, usually a PVC pipe, needs a constant downward slope. A good rule of thumb is a minimum drop of 1 cm for every metre of run. This lets gravity do its job without any help.
You also need to install a P-trap in the line right near the air handler. This little U-bend holds water, creating a barrier that stops unconditioned air and nasty smells from getting sucked back into your system and hurting its efficiency.
Commissioning Your System for Peak Performance
The wrenches are down and the unit is in place, but a professional HVAC unit installation is far from over. Flipping the breaker isn’t the finish line; it’s the start of the most critical phase—commissioning. This is where we prove the system doesn't just run, but runs flawlessly, turning a pile of components into a finely-tuned machine.
This final, meticulous check is what separates a true craftsman from someone who just leaves behind future problems. It all starts with making sure your refrigerant lines are absolutely airtight.
Hunting for Leaks with Nitrogen
Before a single drop of refrigerant enters the system, you have to be 100% certain every connection is sealed. The tried-and-true method is to pressurize the entire line set with dry nitrogen, usually to about 150 PSI or whatever the manufacturer calls for. This inert gas is the perfect tool for the job.
Once it's pressurized, you wait. If that pressure gauge stays rock-solid, you know your brazed joints and flare fittings are perfect. But if that needle budges even a tiny bit, you've got a leak to hunt down and fix. Trust me, skipping this step is a gamble that never pays off in the long run.
Pulling a Deep and Proper Vacuum
After you’ve confirmed the lines are tight, the next enemy to conquer is moisture. Air and water are the arch-nemeses of any refrigeration system. If left inside, moisture mixes with refrigerant and creates corrosive acids that will eat away at the compressor from the inside.
To stop that from happening, you’ll hook up a vacuum pump and pull the system down to a deep vacuum, aiming for below 500 microns. You absolutely need a digital micron gauge for this—the old analog dials on your manifold just aren't accurate enough for such a critical task. A deep, stable vacuum is your guarantee that all moisture has been boiled off and removed, leaving the system pure and dry.
Expert Insight: Holding a deep vacuum isn't just best practice; it's essential for the system's lifespan. Shockingly, poor performance in 42% of new installations can be traced back to sloppy workmanship, like rushing or skipping this evacuation process, which can kill a compressor years before its time.
Charging the System with Precision
Now that you have a clean, dry, and sealed system, it’s time to add the refrigerant. This isn't a "good enough" situation. The manufacturer specifies the exact weight of refrigerant the system requires for peak efficiency.
The only way to hit this target is with a digital refrigerant scale. You'll weigh the precise charge from the cylinder into the system. This method, known as charging by weight, is infinitely more accurate than trying to hit target pressures on your gauges, which can be wildly skewed by the outdoor temperature.
This level of precision is vital. The commercial HVAC market in the Middle East and Africa, valued at USD 10.2 billion in 2024, often struggles with a shortage of skilled techs. This leads to project delays and subpar installations. By sticking to manufacturer-specified procedures like precise charging, we help ensure the system performs exactly as it was designed to.
Final System Startup and Verification
Alright, this is the moment of truth. With the system charged correctly, you can finally power it on. It's time to run a full battery of tests to confirm every part of its operation is within the manufacturer's specified ranges.
These final checks are your last opportunity to spot any hidden issues before you hand the system over to the client.
- Check Temperatures: Use your thermometer to measure the air temperature going into and coming out of the indoor coil. That difference, the "Delta T," is a key indicator of whether the system is exchanging heat properly.
- Verify Airflow: Make sure you have strong, consistent airflow from every single vent. Weak flow could mean a fan issue or a blockage in the ductwork. For more complex jobs, understanding double regulating valves for precise HVAC control is key to balancing the system perfectly.
- Measure Electrical Draws: Grab your multimeter and check the amperage draw on the compressor and fan motors. If the numbers are too high, it could be a warning sign of an impending electrical failure.
Once these checks are complete and everything is documented, you can finally walk away confident that your HVAC unit installation is a success. This rigorous commissioning is also the perfect time to start planning for long-term care. Our HVAC maintenance checklist is a fantastic starting point for any property owner.
You've done the hard work. The lines are run, the unit is set, and the system is humming along nicely. But the job isn't over just because the tools are going back in the truck. A truly professional hvac unit installation wraps up with a focus on the client and the final paperwork.
This final phase is all about building trust and preventing those frustrating, unnecessary callbacks. It’s where you shift from being a technician to being a trusted advisor, making sure the homeowner feels completely confident with their new investment. A flawless install can quickly be undermined by a rushed handover, so let's make sure that doesn't happen.
The All-Important Client Walkthrough
This is arguably the most critical part of the entire handover. Don't just toss a user manual on the counter and head for the door. Take the time to walk the homeowner through their new system, piece by piece. You’re turning a complicated machine into something they can actually understand and use.
Get them comfortable with the basics:
- System Operation: Show them the simple stuff first—how to turn the unit on and off and how to switch between heating and cooling. It might seem obvious to you, but a hands-on demonstration is reassuring for them.
- The Thermostat: Go over every function of that new thermostat. Explain how to program schedules, what the fan settings mean, and why "auto" is usually their best friend. If it’s a smart thermostat, get it connected to their Wi-Fi and help them install the app right there on their phone.
- Critical Maintenance: This is a big one. Show them exactly where the air filter is, how to remove it, and how to slide a new one in. Stress the importance of the replacement schedule—it’s the single best thing they can do to keep the system running efficiently.
- Troubleshooting 101: Let them know what normal sounds to expect. Also, give them a heads-up on potential red flags, like strange new noises or water pooling where it shouldn't. Make sure they have your number for any real issues.
Key Insight: A well-educated client is a happy client. Spending 20-30 minutes on a thorough walkthrough can save you from a dozen confused phone calls later. It's an investment that pays off for both of you.
Nailing the Final Inspection
With the client feeling good about their new system, the last technical hurdle is getting the official sign-off from the local municipality. You pulled the permits at the start; now it's time to prove the job was done by the book.
Passing the final inspection is not optional—it’s the official verification that your work meets all safety and building standards. An inspector will look over everything, including:
- Proper placement of both the indoor and outdoor units.
- Safe and correct electrical connections and disconnects.
- A secure and properly sloped condensate drain line.
- Full compliance with local codes for clearances and safety protocols.
This final approval gives both you and the client legal protection and peace of mind. It’s the official stamp on a job well done.
This commitment to compliance and quality is a major factor in the industry's growth. As of 2024, the MEA HVAC market hit an estimated USD 10.41 billion, with a huge push coming from new construction projects that demand energy-efficient systems. With governments advocating for lower energy consumption in buildings, high-performance, compliant installations have become essential, particularly in booming markets like Saudi Arabia. You can learn more about the rise of energy-efficient HVAC in the MEA region.
The Final Handover Checklist
Before you officially call it a day, run through a quick mental checklist. A clean exit is just as important as a clean installation.
| Task | Purpose | Status |
|---|---|---|
| Clean Up Work Area | Leave the property cleaner than you found it. | ☐ Complete |
| Provide All Manuals | Give the client the warranty info and user guides. | ☐ Complete |
| Final Walkthrough | Educate the client on system use and maintenance. | ☐ Complete |
| Pass Final Inspection | Obtain official municipal approval for the installation. | ☐ Complete |
| Share Contact Info | Ensure the client knows how to reach you for service. | ☐ Complete |
By ticking off these final boxes, you're not just finishing a job; you're building a lasting professional relationship. It shows a dedication to quality that goes far beyond the nuts and bolts, ensuring that new HVAC unit installation provides comfort and satisfaction for years to come.
Common HVAC Installation Questions Answered
Even the most seasoned pros run into questions during an HVAC unit installation. It’s just part of the job. Getting the right answers on the spot is what separates a smooth project from a frustrating one, and it’s critical for ensuring the system runs reliably for years to come.
We’ve fielded countless queries from technicians and clients over the years. Here are a few of the most common ones we hear, along with some straight-shooting advice.
How Long Does a Typical Installation Take?
This is always the first thing people want to know. For a simple residential split-system replacement—where you're just swapping out old units and the existing ductwork and electrical are solid—a sharp team can often wrap things up in 4 to 8 hours.
But don't bank on that being the case every time. The timeline can easily push to a full day or more. Several things can throw a wrench in the schedule:
- Complex Ductwork: If you're running new ducts or have to make major repairs to the old system, that adds significant time.
- Accessibility Issues: Let's be real—crawling through a tight attic in the summer heat or hoisting a unit onto a steep roof will slow anyone down.
- System Type: A standard swap-out is one thing. Installing something more complex, like a multi-zone VRF system or a big rooftop package unit, is a different beast altogether and will take longer.
What Is the Most Common Installation Mistake?
Hands down, the biggest and most costly error we see is improperly sizing the unit. It’s a mistake with a long, painful tail.
Put in a unit that's too big, and it will "short-cycle"—kicking on and off constantly. This is terrible for dehumidification, leaving the air feeling cold and clammy. It also puts massive strain on the compressor.
Go too small, and the unit will run non-stop, fighting a battle it can't win to reach the thermostat setting. Your energy bills will go through the roof, and the system will burn itself out long before its time. This is exactly why a professional load calculation isn't optional; it's essential.
A correctly sized HVAC system is the foundation of efficiency and comfort. Skipping the load calculation is like building a house on a foundation of sand; it’s bound to cause problems down the road.
Should I Replace Both Units at the Same Time?
Yes. Full stop. Modern air conditioners and heat pumps are sold as matched sets for a reason. The indoor air handler and the outdoor condenser are specifically engineered to work in harmony to hit their advertised SEER (Seasonal Energy Efficiency Rating).
If you try to pair a new, high-efficiency outdoor unit with an old, tired indoor coil, you're just asking for trouble. This mismatch tanks the system's performance, kills its efficiency, and puts a ton of stress on the new equipment. Worse, it almost always voids the manufacturer's warranty. You'll be left holding the bag if something breaks. Always replace both components together to get the performance and protection you paid for.
For every phase of your construction or renovation project, from foundational materials to the final fixtures, Yasu Trading Co. LLC provides the high-quality supplies you need to succeed. Discover our extensive range of building hardware, safety equipment, and HVAC components by visiting us at https://yasutrading.com.