
Stain Steel Sheets: Expert Guide to Custom Finishes
When you're looking for a finish that does more than just cover up steel, staining is an incredible option. It’s a totally different approach than painting. Instead of laying down an opaque coat of color, a chemical stain actually reacts with the metal, creating a rich, deep finish that becomes part of the steel itself.
You’re not just applying a color; you’re enhancing the steel’s inherent character.
Why Stain Steel Instead of Painting It
Paint is the go-to for most, but staining has some unique benefits that paint just can't touch. Because a stain chemically bonds with the steel, it creates a finish with unbelievable depth and nuance. It works with the metal’s texture, not against it.
This opens up a ton of creative doors for fabricators, architects, and designers. You can go for anything from a classic, aged bronze look to that rugged, weathered appearance of Corten steel. It’s why you see stained steel used in so many high-end applications:
- Architectural Features: Think custom wall panels, striking decorative screens, and one-of-a-kind building facades.
- Interior Design: It’s perfect for unique countertops, artistic backsplashes, and other statement pieces.
- Custom Furniture: Staining gives tables, shelves, and light fixtures that distinct, industrial-chic vibe that’s so popular right now.
The biggest win with staining? It’s permanent. The color is literally etched into the steel, so it won’t chip, peel, or flake away like paint. This makes it a fantastic choice for high-traffic zones or components exposed to the elements.
This kind of durability is a huge deal, especially in rapidly growing construction markets. For instance, the stainless steel market in the Middle East and Africa is valued at around USD 15.95 billion, with a massive demand for flat products like sheets. In major projects where looks and longevity are non-negotiable, a finish that lasts is critical. You can dig into more market trends over at Data Bridge Market Research.
Staining vs Painting Steel: A Quick Comparison
Here’s a snapshot of how staining stacks up against traditional painting for steel sheets, highlighting key differences in appearance, durability, and application.
| Attribute | Staining Steel | Painting Steel |
|---|---|---|
| Appearance | Translucent, deep, enhances natural metal grain | Opaque, uniform color, covers the surface |
| Durability | Extremely durable; won't chip, peel, or flake | Can chip, scratch, or peel over time |
| Process | Chemical reaction that alters the steel's surface | A film of paint that sits on top of the steel |
| Best For | High-end architectural, decorative, artistic use | General-purpose protection, specific color matching |
Ultimately, staining is about transforming a standard sheet of metal into something truly unique and long-lasting. If you're curious about which types of steel work best for this kind of project, take a look at our contractor's guide to stainless steel sheets.
Gathering Your Materials and Setting Up a Safe Workspace
A beautiful finish doesn't just happen by accident. Before you even crack open a can of stain, a bit of thoughtful preparation goes a long way. Getting your materials in order and creating a safe, organized workspace is the first—and most critical—step to getting that professional look on your stain steel sheets.
Let's start with the star of the show: the steel. Not all stainless steel is going to give you the results you want. From my experience, your best bet is an austenitic grade, specifically something from the 300 series. This type is a favorite in the industry because its corrosion resistance and mechanical properties create the perfect canvas for chemical staining.
There's a reason you see it everywhere. In fact, the 300 series is so common that it made up about 64% of the USD 3.56 billion MEA stainless steel market in a recent year. That kind of dominance speaks volumes about its reliability for high-end finishing. If you're curious about the numbers, you can dig into the regional steel market insights from Grandview Research.
Your Essential Toolkit
Once you've sourced your steel, it's time to gather your gear. Having everything laid out and ready to go keeps the project running smoothly and helps you avoid any last-minute scrambles.
- Acid-Based or Chemical Stains: You'll want a product formulated specifically for steel. They come in all sorts of varieties to create different looks, whether you're going for an aged bronze feel or a dark, moody patina.
- Degreaser: Don't skimp here. A strong, solvent-based cleaner is a must for cutting through any oils, fingerprints, or factory residues.
- Abrasive Pads or Fine-Grit Sandpaper: These are for scuffing the surface just enough to create a "tooth," which gives the stain something to really grab onto.
- Applicators: Depending on the stain's consistency, you might use clean, lint-free cloths, quality foam brushes, or even a sprayer for larger jobs.
Pro Tip: I can't stress this enough—always test your stain on a scrap piece of the same steel first. This is your chance to dial in the timing and application technique before you touch your main workpiece.
Creating a Safe Work Zone
Working with chemical stains is serious business, so your workspace needs to be set up for safety. Good ventilation is non-negotiable. Think an open garage door, a workshop with cross-breezes, or even a powerful exhaust fan. You want those fumes gone.
Next, protect your work surfaces. Lay down some heavy-duty plastic sheeting or a durable tarp to catch any drips or spills. Finally, and most importantly, get your Personal Protective Equipment (PPE) on. This isn't optional.
- Acid-resistant gloves
- Safety goggles or a full-face shield
- A respirator with the right cartridges for chemical fumes
The Non-Negotiable Rules of Surface Preparation
Ask anyone who's done this for a living, and they'll tell you the same thing: your final finish is only ever as good as the prep work that went into it. When you're working with steel sheets, that's not just good advice—it's the law. A perfectly prepped surface is what allows the stain to bond chemically, giving you that deep, even, and durable color that makes the whole project worthwhile.
Your journey starts with a thorough degreasing. Steel sheets almost always come from the factory with a thin film of protective oil or some other manufacturing residue. If you try to stain right over that, you're asking for a splotchy, uneven disaster that you can't fix without stripping everything and starting from scratch. Grab a quality solvent-based degreaser and some clean cloths, and always wipe in one direction. Wiping back and forth just moves the gunk around.
Never skip the degreasing step—hidden oils are the number one enemy of a flawless stain job. Even a single fingerprint can block the chemical reaction and leave a permanent, ghostly mark on your final piece.
Once the steel is totally free of oil and completely dry, it's time to create what we call a "tooth." This is just a fine, uniform texture that gives the stain something to grab onto, both physically and chemically. It’s the exact same principle as priming a wall before you paint. You’re building the perfect foundation for everything that comes next.
Achieving the Perfect Surface Texture
Getting that crucial tooth isn't about just one thing; it's a two-part process involving both mechanical and chemical prep. This one-two punch is your best guarantee that the stain will penetrate and bond consistently across the entire steel sheet.
Mechanical Abrasion (Sanding): This isn’t about heavy-duty grinding. You're just trying to create a subtle, consistent scratch pattern. I've found a 180 to 220-grit sandpaper or a similar abrasive pad works best. The trick is to apply uniform pressure and sand the whole surface in the same direction. This creates a clean, consistent grain and prevents those ugly swirl marks from telegraphing through your final finish.
Chemical Etching: After sanding and wiping down all the dust, a mild acid etch is the final touch. This step microscopically roughens the steel, essentially opening its pores so it can really drink in the stain. Always follow the manufacturer’s instructions to the letter here—apply the etchant evenly, let it sit for the recommended time, and then make sure you neutralize and rinse it completely.
This combination of sanding and etching is what truly separates a professional-looking job from an amateur one. When you take the time to do this, you're making sure every square centimeter of your stain steel sheets is ready to react just how you want it to, giving you that rich, impressive color you’re after. Meticulous prep is the real secret to a finish that looks incredible and stands the test of time.
Alright, let's get into the part where the magic really happens. With your steel sheet cleaned and ready, it's time to apply the stain. This is where you get to see the chemical reaction create that unique, layered finish you've been aiming for. How you apply it makes all the difference, so think about the final look you want before you grab a tool.
There are really three main ways to get the stain onto the steel: brushing, spraying, or dipping. Each has its place.
- Brushing: Using a good foam brush gives you incredible control. It’s my go-to for artistic effects, like creating a faux rust patina or blending different tones.
- Spraying: Got a large, flat sheet? Spraying is your best friend. It delivers a fine, even coat and gets the job done fast.
- Dipping: This is perfect for smaller parts or when you need a perfectly uniform color across every inch of the piece.
Getting the Color and Depth Just Right
The real secret to a dynamic, professional finish on stain steel sheets comes down to two things: timing and layering. The longer you let that stain sit and react with the metal, the deeper and darker the color will get. For a light, subtle brown, you might only need a few minutes. For a rich, dark bronze, you could be waiting much longer.
Here’s the most important piece of advice I can give you: have your neutralizer mixed and ready before you even start applying the stain. The second you hit that perfect shade on your test piece, you need to stop the reaction on a dime to lock it in.
If you're after a complex, multi-toned look, think in layers. Apply your first coat, let it react for just a bit, then neutralize, rinse, and dry it completely. From there, you can go back and apply a second coat to certain areas, letting it sit longer to create darker accents. This is how you build incredible depth and character. Knowing a bit about different manufacturing processes can also spark some great ideas. To see how design and production come together, it’s worth looking into the principles of architectural design fabrication.
The image below breaks down the essential workflow for getting a durable, pro-level finish.
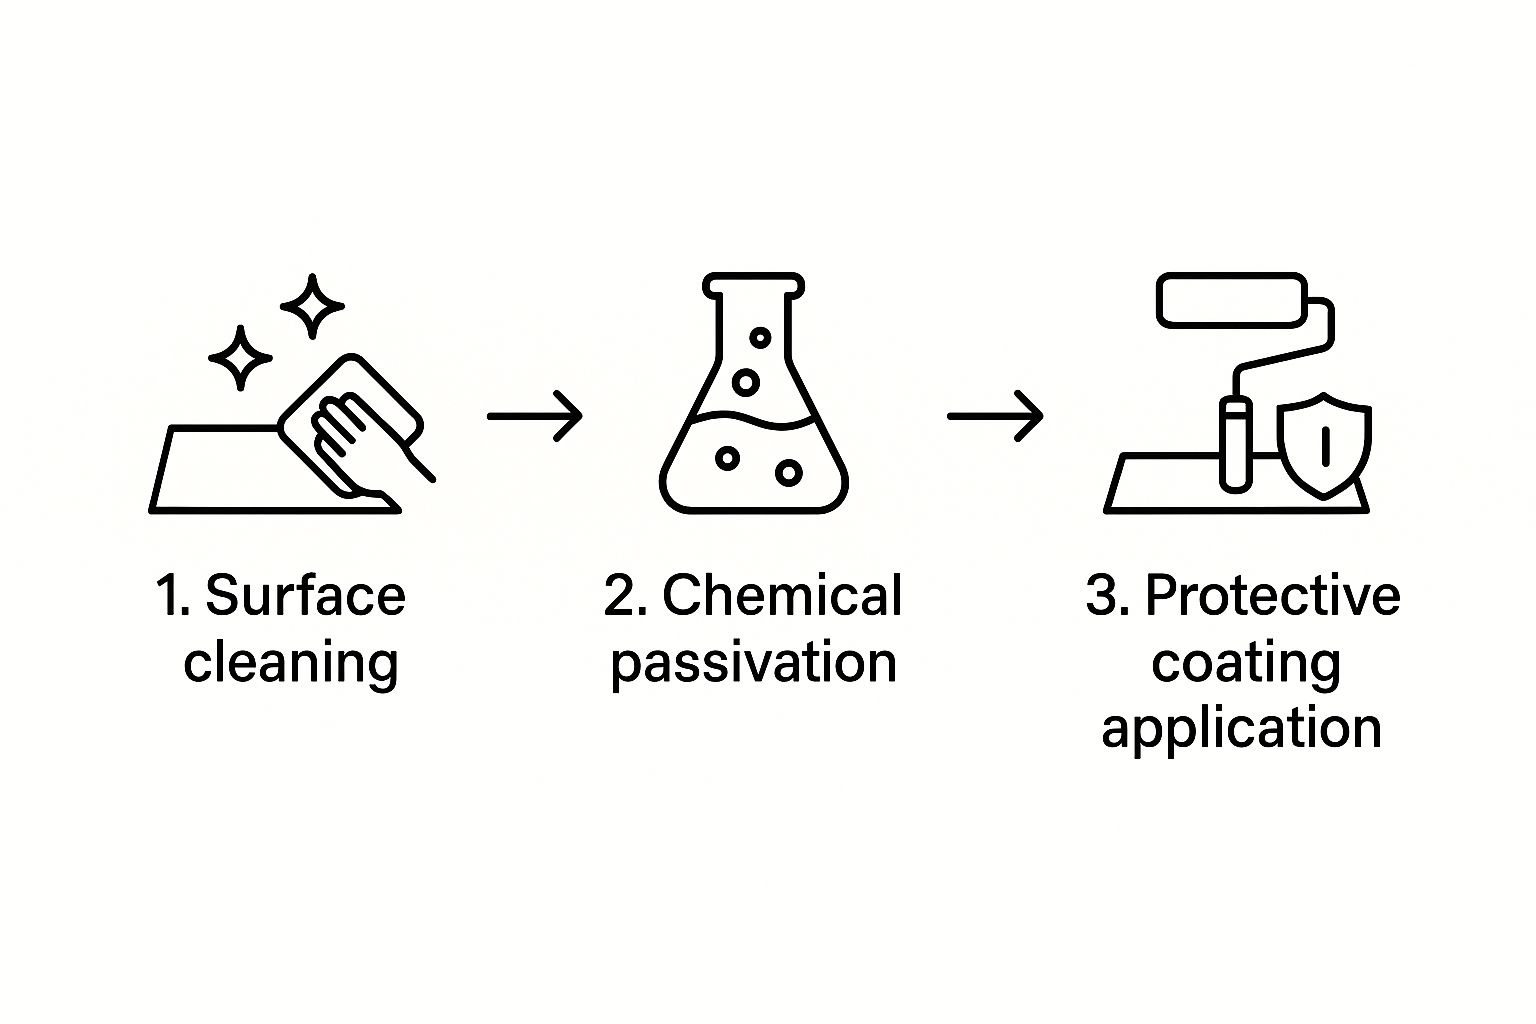
This process shows how every step, from the initial cleaning to the final clear coat, builds on the one before it. These value-added processes are a huge part of the modern steel industry. Back in 2018, the Middle East exported about 88,300 metric tonnes of stainless steel, with finished products like these custom sheets being a major driver. This kind of custom work meets a growing demand for unique architectural materials.
Troubleshooting Common Application Problems
Even when you do everything right, things can sometimes go sideways. Don't panic. Here’s how to fix the most common issues.
- Uneven Color or Splotches: Nine times out of ten, this is a prep problem. If you’re seeing blotches, it almost certainly means some oil or contaminant was left on the surface. Unfortunately, the only real solution is to sand it back down and start the prep process over again, making sure it's spotless.
- Stain Dries Too Fast: This often happens in hot or dry weather. The easiest fix is to work in smaller, more manageable sections. You can also apply a slightly heavier coat of stain, which gives you more working time before it evaporates.
- The Color Is Too Light: You've neutralized the stain, but the color just isn't deep enough. No problem. As long as the surface is clean and dry, you can usually apply another coat right on top to deepen the tone.
Sealing and Protecting Your Finished Steel
You’ve put in the hard work, and your stained steel sheet is looking fantastic. Now for the most important step: sealing it. This isn't just about locking in the look; it's about protecting all that effort from moisture, scratches, and the general wear and tear of time. An unsealed finish is just asking for trouble, but the right topcoat is like armor for your project.
The secret is matching the sealant to the environment. If you’ve created an indoor decorative piece that won't get bumped or touched much, a simple carnauba-based metal wax can give it a beautiful satin sheen and just enough protection. But for anything in a high-traffic area or—especially—outdoors, you need to bring out the heavy-duty options.
For maximum durability, a high-quality, non-yellowing clear coat is almost always your best bet. Just make sure you grab one that’s specifically made for metal.
Applying the Sealant for a Flawless Finish
When you're working with clear coats and lacquers, your application technique is everything. It’s the difference between a perfect, glass-like surface and a finish ruined by drips, runs, or a cloudy haze. Through trial and error, I've learned that applying two or three super-thin coats works infinitely better than one thick, heavy one. This approach builds a much stronger and more uniform layer of protection.
Here's how I do it:
- The Tack Coat: Your first pass should be a very light, even misting. This is your "tack coat," and it gives the next layers something to hang on to. Let it dry until it’s just slightly sticky.
- Building the Layers: Now, apply your subsequent coats, keeping them thin and even. The key here is patience—always follow the manufacturer's recommended drying times between coats. Rushing it is a surefire way to get imperfections.
And for any outdoor project using stain steel sheets, make sure your sealant has UV protection. This is non-negotiable. Without it, the sun will bleach out your beautiful stain work in no time.
Your choice of sealant directly determines how long your finish will last. An outdoor sculpture sealed with an indoor wax will look terrible within a season. On the flip side, a heavy-duty urethane clear coat is probably overkill for a piece of wall art. Always match the protection to the piece's purpose.
Ultimately, sealing your work is a critical part of both the creative process and its long-term care. This mindset of proactive care is a huge part of smart asset management. If you want to dive deeper into that concept, our guide on what is preventive maintenance has some great insights into making things last.
With the right seal, your custom-stained steel will hold its stunning color and depth for years to come.
Answering Your Questions About Staining Steel
Even after you've got the steps down, a few questions always seem to come up when you’re working with stain steel sheets. Let's tackle some of the ones I hear most often so you can get your project done right.
Can You Stain Galvanized Steel?
This one comes up a lot. The short answer? It's really not a good idea. Galvanized steel has a zinc coating that’s there for one reason: to protect the metal from chemical reactions. That's great for preventing rust, but it also means the coating will fight against the acid-based stains we use for coloring.
More often than not, trying to stain galvanized steel just results in the stain eating away the zinc coating in a patchy, unpredictable mess. It ruins the protection and looks terrible. For a beautiful, consistent finish, you’ll want to stick with raw carbon steel or stainless steel.
Why Is My Finish Coming Out Blotchy?
I can almost guarantee that a blotchy or uneven stain points back to one thing: surface prep. This is the stage where a project either succeeds or fails, and cutting corners here will always show in the final result.
What usually goes wrong?
- Lingering Oils: Any grease or oil left on the surface, even just a fingerprint, will act as a barrier and prevent the stain from taking.
- Uneven Sanding: If your sanding isn't uniform, the metal will have a varied texture, causing the stain to absorb differently from one spot to the next.
- Poor Etching: You have to give the etching solution time to work its magic evenly across the entire sheet.
The only real fix, unfortunately, is to sand the whole thing back down to bare metal and start the prep process over. This time, be meticulous.
How long should the stain sit? That really depends on the product you're using and the depth of color you're after. It could be a few minutes or over an hour. This is why testing on a scrap piece is non-negotiable—it’s the only way to perfect your timing.
How Does This Fit Into Bigger Construction Projects?
It's smart to think about how specialized finishes like stained steel play a role in the grand scheme of things. Getting a sense of the overall custom home building process helps you understand where material choices and timelines fit in. If you're working locally, you also need to be on top of local codes. You can learn more by navigating the regulations for building materials in the UAE to make sure every aspect of your project is compliant.