
A Contractor's Fiber Cement Board Installation Guide UAE
Before you even think about the first screw or cut, let's talk about why we're even using fiber cement board here in the UAE. If you've worked on any site from the coast of Sharjah to the high-rises in Downtown Dubai, you know our climate is no joke. It's a proving ground for building materials, and fiber cement consistently comes out on top.
Why Fiber Cement Board Is a No-Brainer for UAE Construction
Picking the right material in the UAE is a decision that has consequences. The constant sun, suffocating humidity, and the occasional sandstorm will chew up and spit out lesser materials like timber or vinyl siding. This is exactly where fiber cement shines. It’s not just a good choice; it’s a smart, strategic one that pays dividends long after the project is handed over.
What’s its secret? A simple but powerful mix of cement, sand, and cellulose fibres. This composite is engineered from the ground up to tackle the biggest headaches we face on UAE job sites, which translates directly into fewer callbacks and a more durable final build.
Built to Survive the Gulf Climate
The biggest win with fiber cement is how it handles our environment. Forget about the rot, warping, or swelling you get with wood when the humidity cranks up. It’s just not an issue. Better yet, it's completely immune to termites and other pests—a huge risk factor eliminated right from the start.
But its toughness goes even deeper, especially when it comes to safety and stability.
- Top-Tier Fire Resistance: This is a big one. Fiber cement board is non-combustible, almost always carrying a stellar A1 fire rating. For any facade or partition work, this makes it an easy choice to satisfy the strict codes from the Dubai Civil Defence.
- Stands Up to Moisture: It simply doesn’t absorb moisture, which means no mould or mildew growth. That’s a massive plus for both the building’s health and the air quality inside.
- Handles the Heat: Think about the crazy temperature swings from a blistering afternoon to a cooler night. Fiber cement stays put, preventing the cracks and buckling that plague other materials.
Hitting All the Right Local Marks
Beyond its physical strengths, it’s crucial that your installation ticks all the boxes for local building codes. You can get a good overview of what's expected by meeting Dubai Municipality requirements, but partnering with a supplier who knows the landscape—like us at Yasu Trading—is your best bet for getting pre-approved, compliant materials from day one.
The numbers don't lie, either. Fiber cement isn't just a niche product anymore; it's becoming a cornerstone of modern UAE construction. The market size hit a massive USD 208.9 million in 2022 and is on track to explode to USD 645.9 million by 2030. That's not just growth; that's a takeover.
For any contractor on the ground, the takeaway is simple. Choosing fiber cement isn't just about the material itself; it's about making your life easier. It streamlines compliance, cuts down on long-term risks, and delivers a finished product that you know will perform in this tough environment.
Your Pre-Installation Checklist for a Flawless Project
A successful fiber cement board installation in the UAE doesn't begin when you make the first cut. It starts long before that, with careful site preparation. I've seen it time and again—rushing this stage is the quickest route to costly mistakes, wasted materials, and frustrating project delays.
Before a single board gets moved, a solid pre-installation checklist is your best defence against the unique challenges we face with our regional climate.
Getting the prep right is all about managing variables. From confirming your substrate is spot-on with the approved plans to making sure every tool is ready to go, these initial steps define the quality and speed of the entire job. It’s the difference between a smooth, efficient workflow and a chaotic scramble.
Verifying Substrate and Site Conditions
The first order of business is to get your eyes on the framing or substrate. Whether you're working with steel or timber frames, they absolutely must be perfectly plumb, level, and true. Any deviations here will telegraph right through to the finished cladding, and you’ll see every imperfection.
- Cross-Reference with Drawings: Always check your as-built frame against the official municipality-approved drawings. Any discrepancy, no matter how small, in stud spacing or structural details has to be rectified before you even think about cladding. This isn't just good practice; it's a critical compliance checkpoint.
- Inspect for Damage: Look for any hint of rust on steel frames or moisture damage on timber. In the UAE's humidity, even a tiny spot of corrosion can snowball into a major problem down the line.
- Manage Ground-Level Moisture: Make sure the area has proper drainage. Any chance of standing water or rising damp needs to be sorted out immediately to protect the lower boards and the framing itself.
Thinking through the site logistics from the start saves so many headaches. Organising your workspace isn't just about being tidy; it's about safety and efficiency. This means setting up a dedicated, clean cutting station away from high-traffic zones to manage dust and keep everyone safe.
This infographic really nails down why this prep work is worth the effort, showing the core benefits driving the material's popularity.
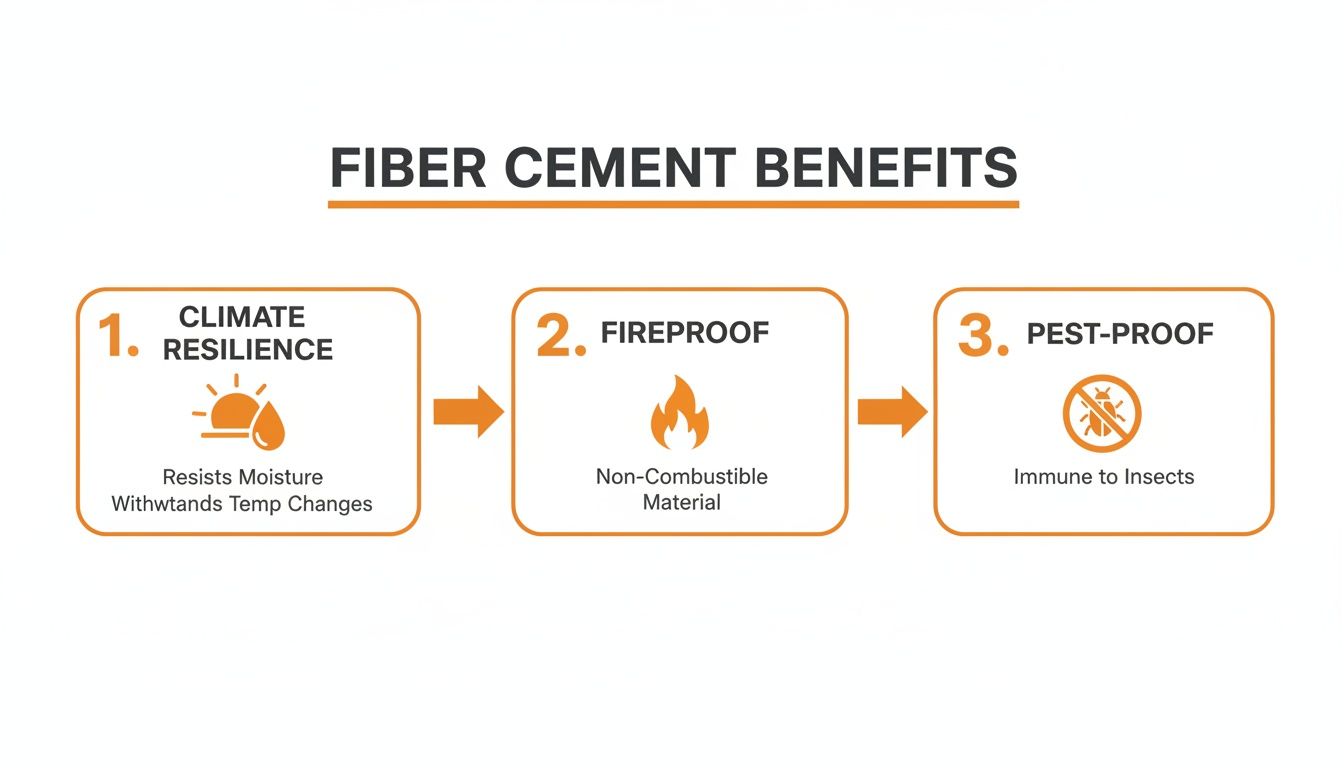
As you can see, the material is engineered to handle our climate, resist fire, and keep pests out. But you only get those benefits when the installation is done right, straight from the foundation up.
Material Acclimatisation and Handling
One of the most overlooked steps, and one that can cause real problems, is acclimatisation. Fiber cement boards have to adjust to the site's temperature and humidity before they go up on the wall. Skipping this is a direct cause of future warping or buckling, especially with our dramatic temperature swings.
Site-delivered boards should be stacked flat on a level surface, off the ground on pallets, and kept under cover. Give them a minimum of 48 to 72 hours to acclimatise before installation. This ensures they'll be dimensionally stable.
This simple pause lets the moisture content inside the boards equalise with the local environment, which stops them from moving around after they’ve been fixed.
Handling them correctly is just as critical. Boards should always be carried on their edge by two people to stop them from flexing and breaking. Dropping them flat is an easy way to chip corners and edges, leading to waste. A consolidated, smooth delivery from a supplier like Yasu Trading helps immensely here, ensuring your materials arrive undamaged and ready for proper storage.
Assembling Your Tools and PPE
Finally, do a full inventory check of your tools and Personal Protective Equipment (PPE). Nothing kills momentum on day one faster than realising you don't have the right saw blade or that your team is short on dust masks.
Your Essential Pre-Installation Kit:
- Cutting Tools: A circular saw with a PCD (polycrystalline diamond) blade designed specifically for fiber cement is non-negotiable. It’s the only way to get clean cuts and have your blade last.
- Safety Gear: Make sure every worker has a properly fitted FFP3 or N95 dust mask, safety glasses, gloves, and a hard hat.
- Measuring and Marking: A good quality tape measure, chalk line, and a layout square are basics you can't do without for accuracy.
- Fixings and Fasteners: Have all your specified corrosion-resistant screws and nails counted, organised, and ready to go.
Taking an hour to run through this checklist guarantees that when the work starts, your team can focus completely on one thing: a perfect fiber cement board installation.
Mastering Cutting and Handling Fiber Cement Boards
How you handle and cut your fiber cement boards on-site is a game-changer. It directly impacts the quality of your finish, the safety of your crew, and your bottom line. This isn't just about getting a straight edge; it's about minimising waste, protecting the board's integrity, and, crucially, managing dust in line with strict UAE regulations.
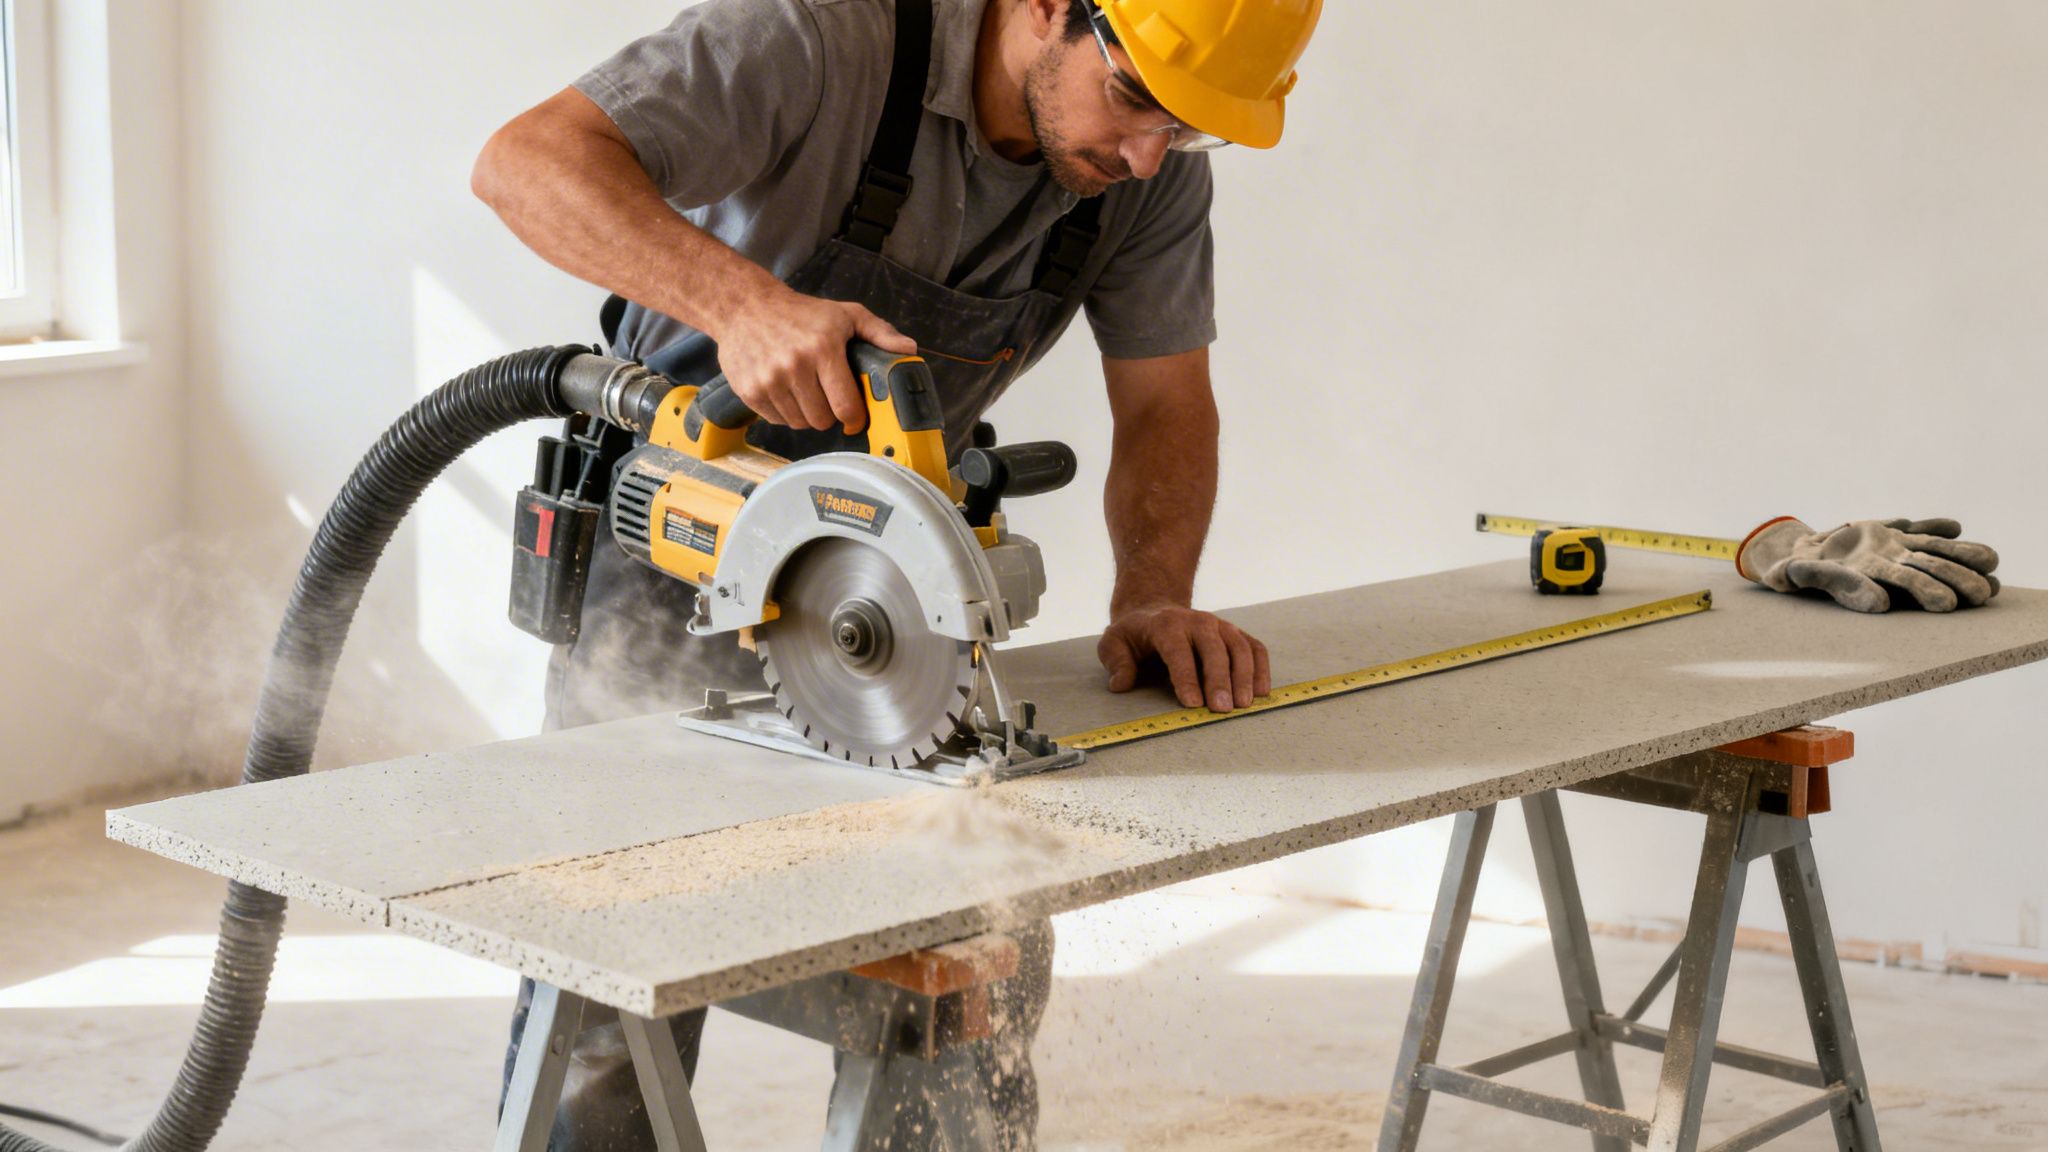
A lot of new installers underestimate just how dense and abrasive these boards are. Jump in with the wrong tools, and you'll burn through blades, end up with a chipped, messy finish, and create unnecessary risks. Getting this part of the fiber cement board installation guide uae right really sets the stage for a professional job.
Choosing Your Cutting Method
The right cutting method really boils down to the thickness and density of the board you're working with. For the thinner, lower-density boards—usually anything under 8mm—a simple manual technique is often your best bet. It’s effective and keeps dust to an absolute minimum.
The "score and snap" method is a classic for a reason. Grab a carbide-tipped scoring knife and a straight edge, make one deep, clean score along your cut line, and then apply firm, even pressure. The board will snap cleanly right where you want it. It’s fast, quiet, and generates almost no airborne dust.
But once you’re dealing with thicker, high-density exterior cladding or flooring panels, you absolutely need a power tool.
Power Tools and Blade Selection
When you switch to power tools, the blade is everything. Don't even think about using a standard wood or masonry blade; it'll dull in minutes and leave you with chipped edges. You need a blade built specifically for this material.
Your best investment here is a circular saw fitted with a polycrystalline diamond (PCD) tipped blade. These things are engineered to chew through the abrasive nature of fiber cement, delivering clean cuts for thousands of linear feet without dulling. Yes, they cost more upfront, but they save a huge amount of money and time over the course of a project.
Another great option is a dedicated fiber cement shear. Think of it as a pair of powerful, fast-moving scissors that nibble through the board. The main advantage? It produces very little dust because it cuts rather than grinds. Shears are fantastic for straight cuts and notches.
Critical Dust Control and Safety
This is non-negotiable. The dust from cutting fiber cement contains crystalline silica, a serious respiratory hazard. Dubai Municipality and other local authorities have very stringent regulations on silica dust exposure on construction sites.
Following dust control measures isn't just a good idea; it's a legal requirement in the UAE. Getting this wrong can lead to hefty fines and work stoppages. The health and safety of your team always come first.
Effective dust control requires a few layers of protection:
- Integrated Dust Collection: Your circular saw should have a vacuum port connected to an M-class or H-class dust extractor. This setup captures the vast majority of dust right at the source.
- Wet Cutting: For stationary saw setups, a wet cutting system is an option. The water suppresses dust completely, though it’s often less practical for mobile cuts across a large site.
- Proper PPE: Every single person in the cutting area must wear, at a minimum, FFP3 or N95-rated dust masks, along with safety glasses and gloves. This is your final, and most personal, line of defence.
A smart move is to set up a designated cutting station downwind and away from other workers. This helps contain any residual dust and keeps the rest of your site cleaner and safer for everyone.
Before we dive into the tooling specifics, here's a quick-reference table for what you'll need on-site. Having the right gear from the start makes all the difference in both safety and efficiency.
Essential Tools and PPE for Fiber Cement Installation
| Tool/PPE Item | Specification/Type | Purpose and UAE-Specific Note |
|---|---|---|
| Circular Saw | With vacuum port | Essential for straight, fast cuts. A model with a dust port is crucial for connecting to an extractor, a key requirement for site compliance. |
| PCD Blade | Polycrystalline Diamond Tipped | The only blade that withstands fiber cement's abrasiveness long-term. Reduces chipping and saves money on frequent blade replacements. |
| Dust Extractor | M-Class or H-Class | A standard shop vac won't do. These specialised extractors are required by UAE safety standards to capture fine silica dust effectively. |
| Dust Masks | FFP3 or N95-rated | Mandatory personal protective equipment for anyone near cutting operations to prevent inhalation of harmful silica dust. |
| Safety Glasses | Impact-resistant, wrap-around | Protects eyes from flying debris and dust. Non-negotiable on any UAE construction site. |
| Scoring Knife | Carbide-Tipped | Used for the 'score and snap' method on thinner boards. The carbide tip stays sharp far longer than steel. |
| Fiber Cement Shears | Electric or Pneumatic | An excellent, low-dust alternative for straight and curved cuts, helping to simplify dust management on-site. |
Equipping your team with these items isn't just about following the rules; it's about setting them up for a successful, high-quality installation from the get-go.
Safe Handling and On-Site Logistics
Finally, let’s talk about handling. Fiber cement boards are incredibly strong once installed, but they can be brittle and easy to damage before then. Chipped corners and cracked edges look unprofessional and create waste that eats directly into your project budget.
Key Handling Best Practices:
- Always Carry Boards on Edge: Never, ever carry them flat. This stops them from flexing under their own weight and snapping. Two people should always carry a full-sized board.
- Avoid Dropping or Impact: Don't slide boards off a stack or let them drop onto hard surfaces. Place them down carefully to protect the edges and corners.
- Use a Flat, Level Staging Area: Keep your boards stacked neatly on a flat, dry surface near the work area. This minimises unnecessary movement and the risk of damage.
Master these cutting and handling techniques, and you'll ensure every board is installed perfectly, your team stays safe, and your project remains compliant and profitable.
Fixing and Fastening: The Secret to a Long-Lasting Facade
Alright, your fiber cement boards are cut to size and ready to go up. This next step is where the rubber meets the road—securing them to the structure. This isn't just about screwing in a few panels; it's about engineering a facade that can stand up to everything the UAE climate throws at it, from intense summer heat to coastal humidity. How you fix your boards will decide if your project looks great for five years or for fifty.
This section of our fiber cement board installation guide uae is all about the practical mechanics. We're moving past theory and getting into the nitty-gritty of creating a finish that's not only visually impressive but structurally solid.
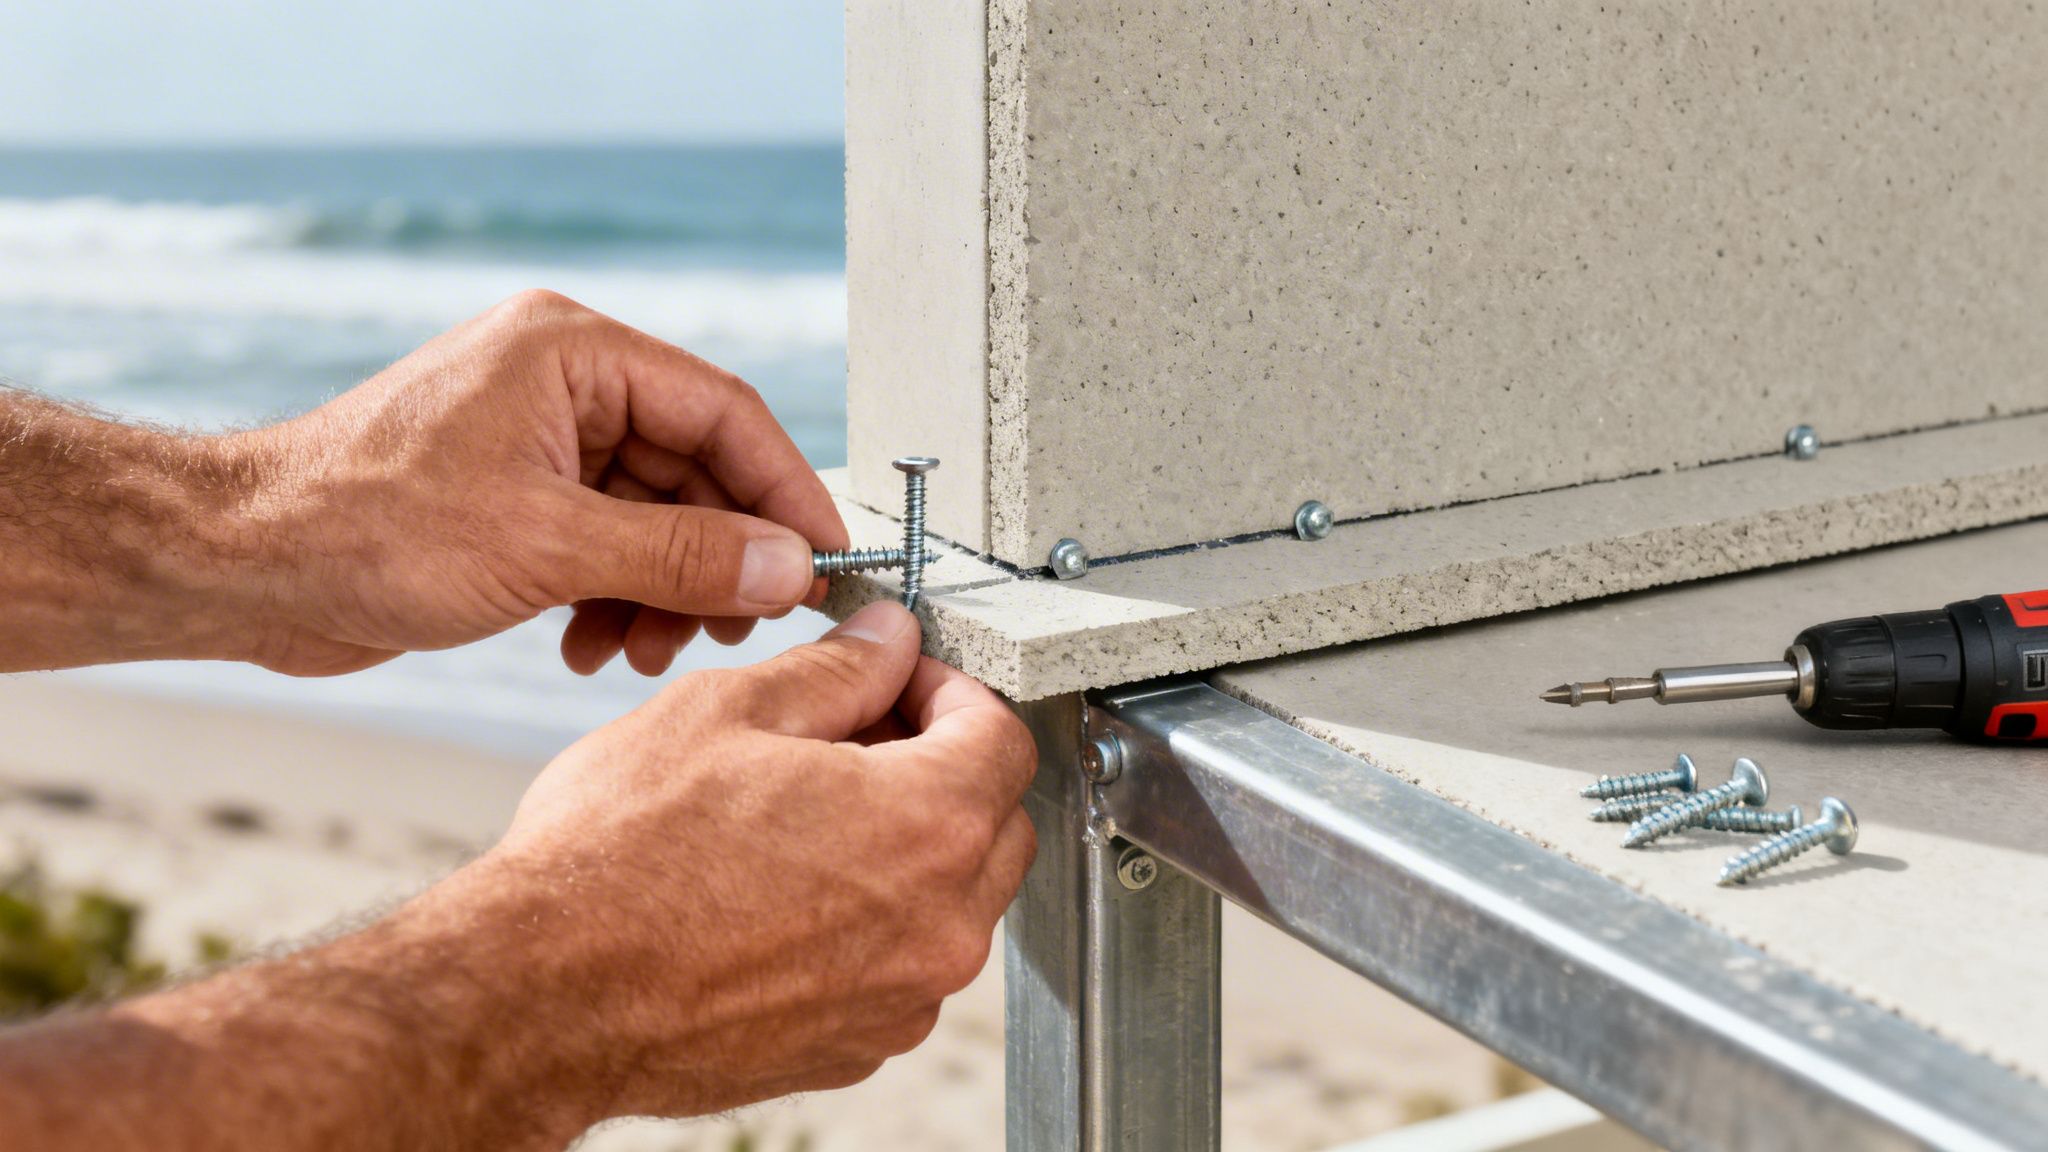
Choose Fasteners That Can Handle the Humidity
Let me be blunt: using the wrong fasteners is the single biggest mistake you can make on a job like this. The salty, humid air in places like Dubai, Sharjah, and Abu Dhabi is a killer for metal. If you use standard zinc-plated or regular galvanised screws, you're just asking for trouble. They will rust, leading to ugly stains, structural weakness, and eventually, panel failure.
For any exterior work here in the UAE, you need fasteners made from stainless steel (Grade 304 or 316). Alternatively, high-performance ceramic-coated screws rated for marine environments will do the trick. Anything less is just a future headache and a costly callback. This isn't a place to cut corners. For a deeper dive into your options, we've put together a full guide on choosing the right fasteners in Dubai.
Nail Your Spacing and Placement
Precision is everything when you're driving those screws. Get the spacing wrong, and you create stress points that can cause cracks down the line. Drive them too deep, and you compromise the board's integrity. While you should always defer to the board manufacturer's specs, there are a few rules of thumb that apply across the board.
- Keep Your Distance: Your screws should be at least 20mm away from the vertical edges and 50mm from the top and bottom edges. This stops the corners from cracking or chipping out under load.
- Mind the Studs: Across the main part of the board (the "field"), your fasteners should line up with the framing, which is typically on 400mm or 600mm centres.
- Get the Depth Just Right: The screw head needs to sit perfectly flush with the board's surface. If you over-drive it, you'll fracture the material. If it's left sticking out, you'll have an uneven surface for finishing and create a potential entry point for moisture.
This isn't just about making it look neat. This methodical approach ensures that wind loads and thermal expansion stresses are spread evenly across the facade, preventing any single point from failing.
The use of fiber cement board in UAE construction has absolutely skyrocketed. It’s part of a wider Middle East trend where the market pulled in over 3% of global revenue, hitting USD 0.30 billion in 2023. With Dubai expecting more than 150 new hotels by 2025, the pressure is on for efficient building materials. Medium and low-density boards are especially popular for interior walls because they can be installed twice as fast as old-school gypsum. You can find more data on the regional fiber cement board market.
Don’t Forget the Expansion Gap—It's Non-Negotiable
If there’s one thing that will ruin a fiber cement installation in the UAE's climate, it’s ignoring thermal movement. These boards expand in the heat and shrink when things cool down. If you don't give them room to move, they will buckle, crack, and pop your joints. This is probably the number one cause of failure I see in the field.
To avoid this disaster, you absolutely must leave a consistent expansion gap at every joint.
Essential Expansion Gap Rules:
- The Magic Number: You need a minimum gap of 6-8mm between all boards. This applies to butt joints, corners, and anywhere a board meets another surface like a window frame or trim.
- Keep it Consistent: Use a 6mm spacer tool (or even an off-cut of a board) to make sure your gap is perfectly uniform everywhere. A consistent gap is crucial for both a professional finish and for the sealant to do its job properly.
- Never Force It: Whatever you do, never butt the joints tightly together. That creates huge internal pressure as the boards expand in the sun, and something will eventually have to give.
That gap isn't just empty space; it’s an engineered joint. It’s designed to absorb the stress of daily temperature swings, keeping the whole facade stable and looking sharp for years. Once it's properly sealed, it becomes an integral part of your building's weatherproof shield.
Achieving Weatherproof Joints and Professional Finishes
Once the fibre cement boards are securely fixed, your focus shifts from the structural work to the finish. This is the part of the job that everyone sees and the part that needs to stand up to the elements for years to come. The jointing, sealing, and painting are what truly weatherproof the building and give it that crisp, professional look the client is paying for.
I’ve seen too many projects where excellent framing and board fixing were let down by a rushed finishing job. Here in the UAE, with the intense sun and occasional downpours, a weak seal or a poor paint job will fail fast.
This part of our fibre cement board installation guide uae is all about creating a seamless shield against water, UV, and dust. A great finish isn't just about appearances; it’s an engineered system that protects the entire structure.
Mastering Weatherproof Jointing Techniques
Those expansion gaps you carefully left between the boards? They're your first line of defence against thermal movement. Sealing them correctly is what makes the system waterproof. The approach you take often comes down to the architectural design, but the objective is always a flexible, durable seal.
In the UAE, you'll typically see one of two methods:
- Expressed Joints: This is a popular modern look where the gap is left partially open for visual effect. To create the waterproof barrier, a UV-stable EPDM weather strip is installed behind the joint. It looks fantastic, but it demands real precision to get the strip perfectly aligned.
- Filled Joints: Far more common, this method involves filling the entire gap with a high-performance sealant. You end up with a smooth, seamless surface that’s incredibly effective at keeping out water and dust.
For filled joints, there's more to it than just squirting sealant into the gap. You need to use a bond breaker for it to work as designed.
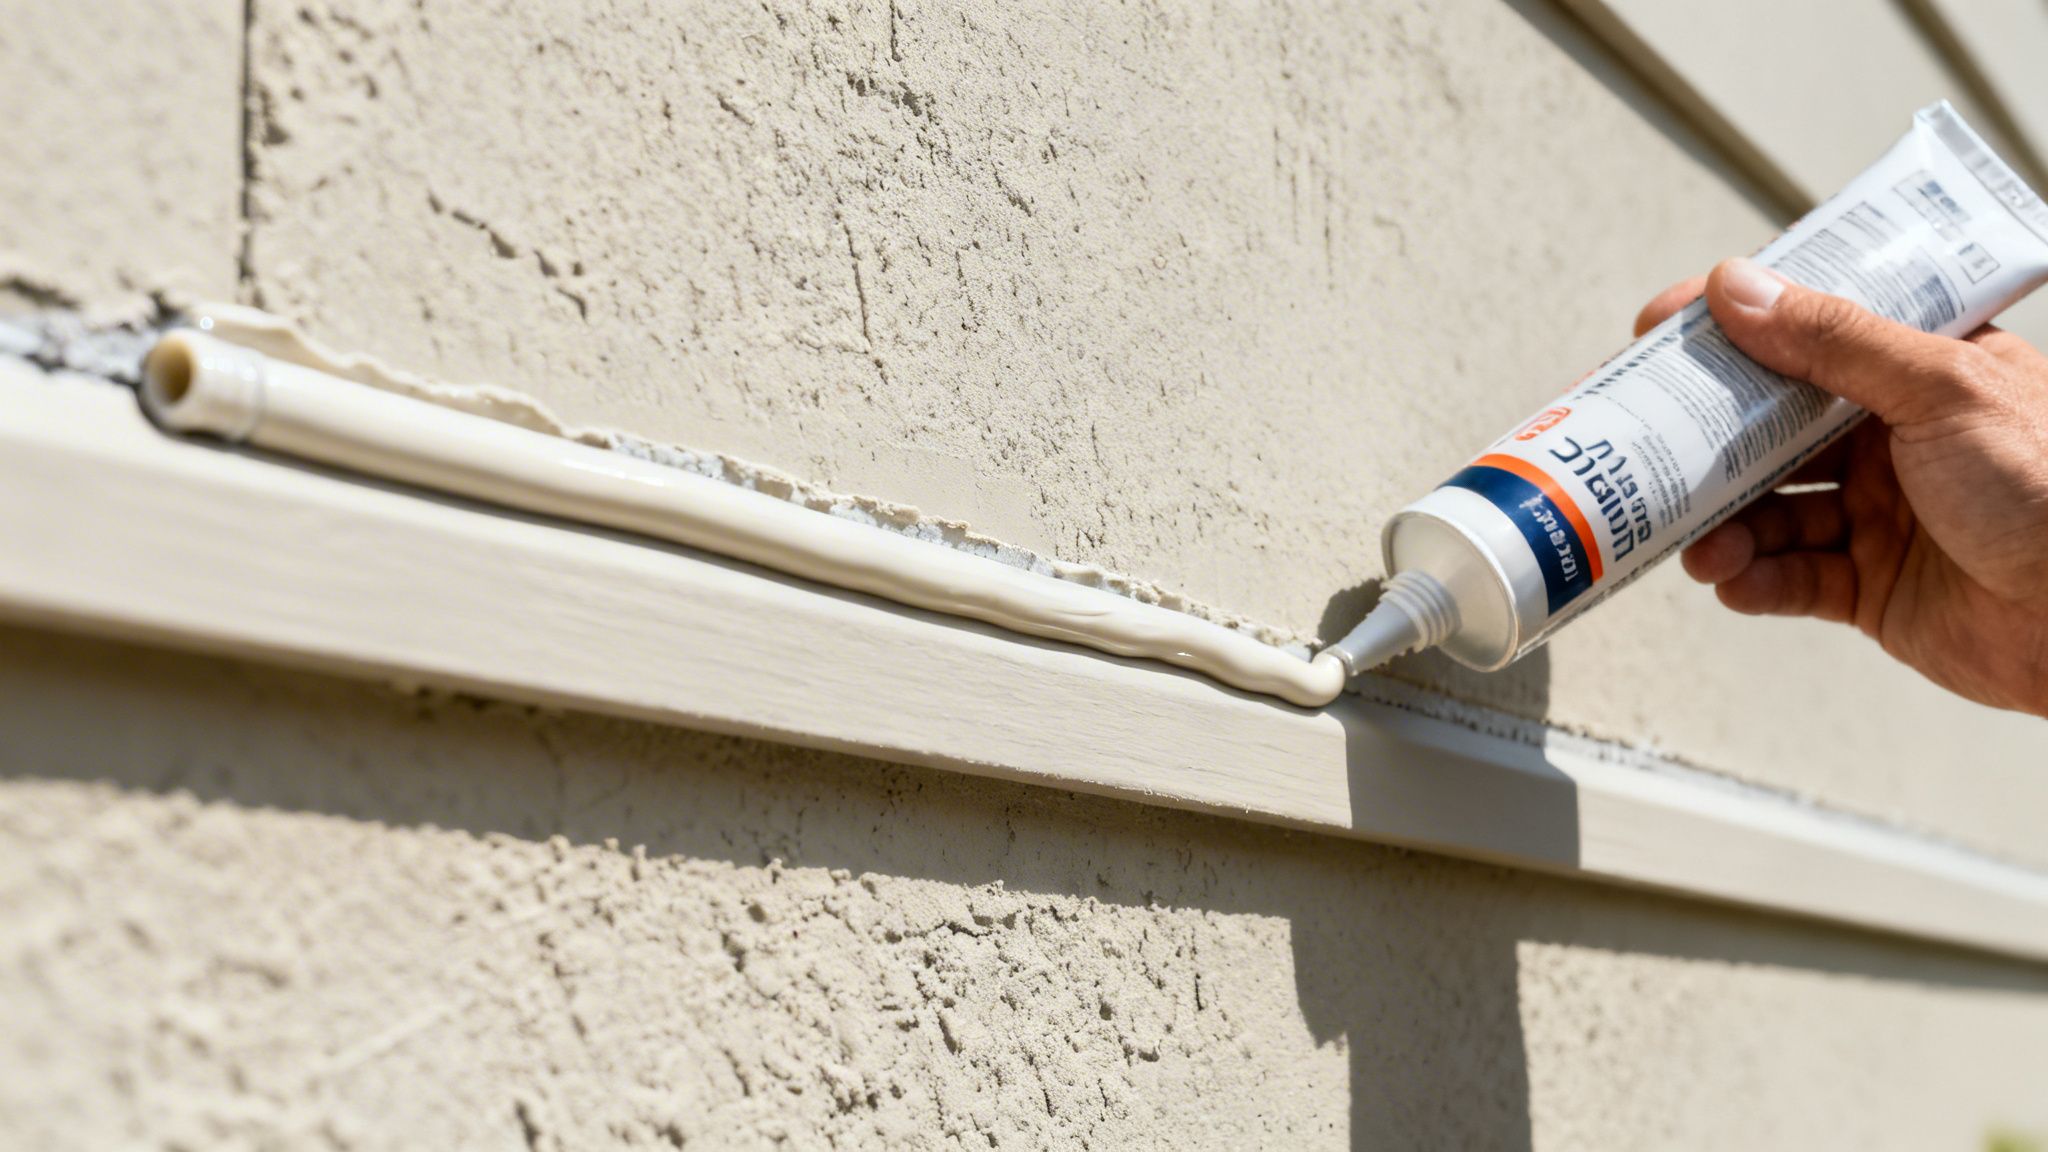
Applying Sealants for a Bulletproof Seal
A proper, long-lasting sealed joint is a three-part system: the backer rod, the sealant, and clean board edges. That backer rod—a simple foam cylinder—is the unsung hero. It controls the depth of the sealant, forcing it into an hourglass shape. This shape is what allows it to stretch and compress effectively without tearing as the boards move with temperature changes.
Here’s the process we follow on-site:
- Insert the Backer Rod: Start by pushing a closed-cell polyethylene backer rod into the 6-8mm gap. Make sure it's slightly oversized so it fits snugly. It should sit about 3-4mm below the face of the board.
- Apply the Sealant: Grab a high-quality, paintable polyurethane or hybrid polymer sealant. You're looking for something with a high movement capability—check the tube for Class 25LM or higher. Apply a continuous, steady bead over the backer rod, making sure it makes good contact with both board edges.
- Tool for Perfection: As soon as you've applied the sealant, tool it off with a small spatula or even a wetted finger. This simple action forces the sealant against the edges for a strong bond and leaves a clean, concave finish.
The UAE's push for sustainable building has made fibre cement a go-to material. It's a market now worth around USD 450 million, thanks to all the urban growth and green building mandates. High-density boards dominate with a 61% market share—they're tough enough for roofing and flooring that can last over 50 years under our intense sun, where the UV index hits 12. But keep an eye on low-density boards; they're the fastest-growing segment, especially for lightweight cladding in hotel refurbs.
For a deeper dive into the science behind this, check out our guide on advanced sealants and waterproofing formulations for the UAE climate.
Surface Preparation and Painting
With the joints all sealed up, it's time for the final coat of armour: the paint. The secret to a finish that won't peel, blister, or fade in the UAE sun is all in the prep work. Don't cut corners here.
Before a drop of primer or paint touches the boards, the entire surface needs to be spotless.
- Clean Thoroughly: Get rid of all the construction dust, dirt, and any greasy marks. A wipe-down with a damp cloth usually does the trick, but for anything stubborn, use a mild detergent and rinse it off completely.
- Ensure it is Dry: This is critical. The surface must be bone-dry before you paint. Any moisture trapped underneath will eventually cause the paint to fail.
- Prime Correctly: Use a top-quality, 100% acrylic primer made for masonry or fibre cement. This step is non-negotiable. It seals the board and gives the topcoat a perfect surface to grab onto.
For the finish, always specify a premium, 100% acrylic latex paint with excellent UV resistance. Two topcoats is the standard to get the right colour depth and durability. If you want truly professional results, using an airless sprayer is the way to go; it delivers a beautiful, even finish that you just can't get with a roller. There's a great contractor's guide to flawless finishes using an airless sprayer that is an invaluable read for getting this final stage perfect.
Of course. Here is the rewritten section, crafted to sound like it was written by an experienced construction professional in the UAE.
Your Top Installation Questions, Answered
No matter how well you plan, questions always pop up on-site. That’s just part of the job, especially when you’re working with a material like fibre cement in the UAE’s unique climate. We’ve pulled together the most common queries our teams get from contractors across Dubai, Abu Dhabi, and Sharjah to give you some quick, no-nonsense answers.
High-Density vs. Low-Density Boards: What’s the Real Difference?
It all boils down to where and how you’re using the board. Think of high-density boards as your heavy lifters. They’re built tough for external cladding, roofing, and flooring—anywhere you need serious structural strength and impact resistance. Their sheer robustness is why they’re a go-to for meeting the strict fire codes from authorities like the Dubai Civil Defence.
Low-density boards, on the other hand, are much lighter. This makes them ideal for interior work like partitions, ceilings, or decorative facades that aren’t taking a beating. They’re a lifesaver in renovation projects where you can't add too much weight to the existing structure. Getting this choice right from the start, based on your architectural and engineering specs, is absolutely critical.
How Do I Stop the Dubai Heat from Wrecking My Joints?
Thermal movement isn’t a theory here; it’s a reality you have to design for. The daily temperature swings in the UAE are massive, and they will make fibre cement boards expand and contract. I’ve seen more projects fail from ignoring this than from anything else. It leads to buckling, cracked boards, and busted joints every single time.
The rule is simple and non-negotiable: leave a 6-8mm expansion gap between every single board. That means at all butt joints, corners, and where the board meets anything else, like a window frame. Pushing them tight together is just asking for trouble down the line.
Once you have the gap, you need to seal it properly. You'll need a flexible, UV-stable sealant—think a quality polyurethane or silicone with a Class 25LM rating or higher—and you must apply it over a backer rod. This creates a joint that can actually move with the building instead of tearing itself apart.
What’s the Smartest Way to Get Materials to a Site in Sharjah or Abu Dhabi?
When you're working outside the main hub of Dubai, logistics can make or break your schedule and budget. The best advice I can give is to find a single, consolidated supplier. Trying to coordinate separate deliveries for boards, fixings, blades, and sealants is a nightmare waiting to happen. You’ll be stuck with delays and endless phone calls.
A one-stop-shop partner streamlines everything. All your municipality-approved materials—from the boards themselves down to the right corrosion-resistant screws and PPE—get bundled into one organised delivery straight to your site. This simple move cuts out all the logistical chaos and ensures your crew in Sharjah or Abu Dhabi has everything they need, right when they need it.
Are There Special Fire Safety Rules for Fibre Cement Cladding?
Yes, and you absolutely cannot afford to get them wrong. The UAE Fire and Life Safety Code of Practice is incredibly detailed about facade materials. This is actually one of the biggest reasons fibre cement is so widely used; most quality boards come with an A1 or A2 non-combustible rating, which makes them a fantastic choice for compliance.
But here’s the crucial part: just using a fire-rated board isn't enough. You have to install the entire tested system exactly as the manufacturer specifies and as approved by authorities like the Dubai Civil Defence. This means using the right framing, installing the proper fire-rated barriers, and using the specified fixings. It's the complete system that gives you the fire performance, not just the board itself.
For a reliable supply of municipality-compliant fibre cement boards and all the necessary accessories for your next project, trust Yasu Trading Co. LLC. We deliver everything you need directly to your site, ensuring your fiber cement board installation guide uae is backed by quality materials. Visit https://yasutrading.com to get started.