Pipe Wrench Dimensions Guide: Sizes, Jaws and Selection
A 14 inch pipe wrench won't grip a 14 inch pipe, and a longer handle doesn't fix a jaw that's too small. That's the specification error I see buyers repeat most often. Pipe wrench dimensions only work when you separate nominal size, overall length, jaw capacity and governing standard, then match those numbers to the pipe's outside diameter, material, insulation and access space. Get that order right and you'll stop ordering tools that fit the catalogue label but not the joint.
Pipe Wrench Sizes and Overall Lengths at a Glance
The inch number is a nominal class, not the pipe diameter the jaws can grip. Overall length tells you about force and access. Jaw capacity tells you whether the tool engages the pipe at all. Treat them as separate specifications every time.
The Dubai-listed heavy-duty pipe wrench range includes 8, 10, 12, 14 and 18 inch wrenches at approximately 200, 250, 300, 350 and 450 mm overall lengths respectively. That's a 50 mm step between smaller sizes, then a 100 mm jump from 14 to 18 inches. A separately catalogued 265 mm wrench with a 44 mm jaw capacity proves the point. Length alone doesn't fix grip range.
| Nominal size | Overall length (approx.) | Typical pipe capacity (approx.) | Common use |
|---|---|---|---|
| 6 in | 150 mm | up to 1/2 in | Small fittings, tubing, instrument lines |
| 8 in | 200 mm | up to 3/4 in | Domestic plumbing, tight valve work |
| 10 in | 250 mm | up to 1 in | General plumbing and fitting installation |
| 12 in | 300 mm | up to 1-1/4 in | Maintenance and small mains |
| 14 in | 350 mm | up to 2 in | Heating, cooling and water service lines |
| 18 in | 450 mm | up to 3 in | Plant room and commercial pipework |
| 24 in | 600 mm | up to 4 in | Large pipe and heavy-duty maintenance |
| 36 in | 900 mm | up to 6 in | Industrial and large-diameter service |
Use the table as a starting point only. Capacity and weight vary by model, head casting and handle material, so confirm both on the actual product before ordering.
Buying rule: Record nominal size, overall length in millimetres and jaw capacity in millimetres for every purchase. A label that says only 12 inch isn't a specification.
If a supplier lists mixed imperial and metric figures, don't convert in your head and assume the rest follows. Write both units on the order, then check the jaw figure separately.
Parts of a Pipe Wrench and Where to Measure
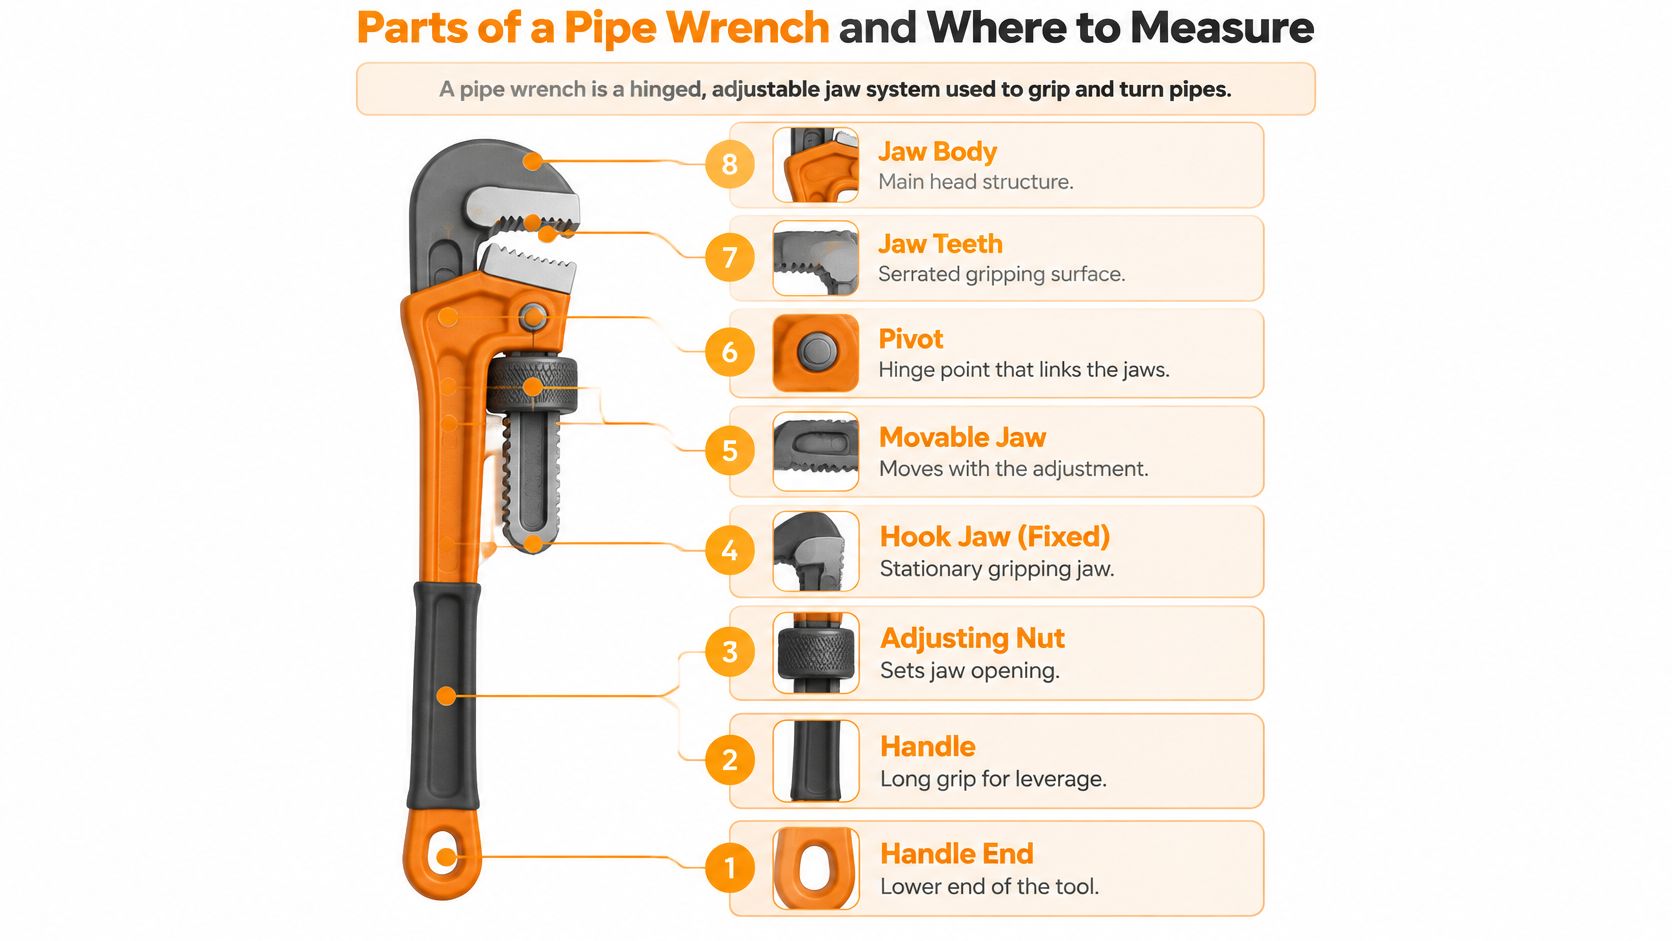
A pipe wrench is a hinged, adjustable jaw system. The hook jaw moves against a fixed heel jaw, and the teeth bite harder as you pull in the correct direction. Each part controls a different dimension, which is why a single length figure can't describe the tool.
The diagram below labels the measurement points you should mark before you write a specification.
From Handle to Jaw
- Handle and handle end: The lever arm. Longer handles multiply torque, but they also need more swing space and add weight.
- Adjusting nut: Sets the jaw opening. Wear or damaged threads here create play, so the set opening drifts under load.
- Hook jaw and movable jaw: Form the moving side of the grip. Their travel sets jaw capacity, the maximum opening between inner jaw faces.
- Pivot: Links the jaws and carries the hinge load. A worn pivot allows side movement and uneven bite.
- Jaw teeth: Serrated faces that grip round pipe. Tooth pitch and sharpness affect bite, especially on scaled or corroded steel.
- Jaw body: The head casting. Its depth affects whether a fitting sits properly in the jaws without bottoming out.
Overall length runs from handle end to jaw tip with jaws closed. Handle length runs from handle end to pivot, and that's the lever you feel. Weight follows handle material and head size. Aluminium handles reduce carry weight for ladder and overhead work, while iron handles suit bench and plant-room use where weight matters less.
Sketch a simple three-view mark-up before specifying. Mark overall length, handle length, jaw capacity and jaw depth. You'll spot missing data before it becomes a wrong delivery.
How to Measure Overall Length and Jaw Capacity
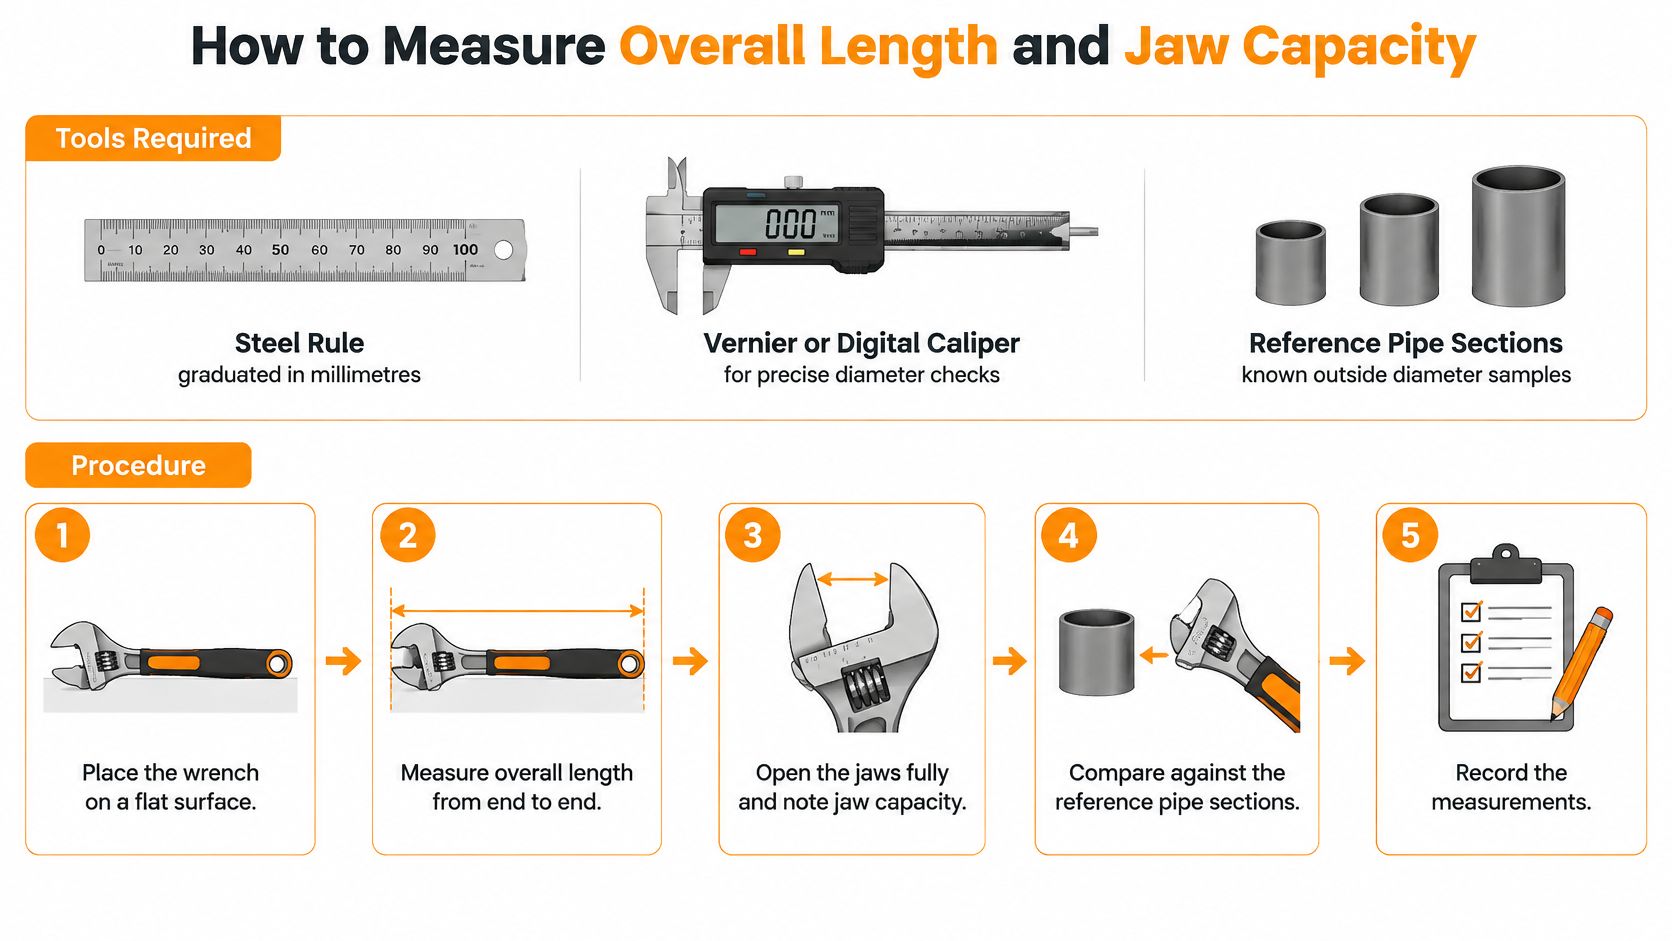
You need three items. Use a steel rule graduated in millimetres, a vernier or digital caliper, and reference pipe sections with known outside diameters. Don't rely on stamped markings alone, especially on worn tools already in your store.
Measurement Procedure
- Close the jaws fully. Lay the wrench flat so the head doesn't rock. A partly open jaw inflates the length reading.
- Measure overall length. Read from handle end to jaw tip on the steel rule and record it in millimetres.
- Open the jaws fully. Measure the gap between inner jaw faces with the caliper. That's jaw capacity, not the outside width of the head.
- Measure handle length separately. Read from handle end to pivot centre. This explains why two wrenches with similar overall lengths can feel different under load.
- Test against reference pipe. Measure the pipe outside diameter, place it in the jaws and confirm it seats on the teeth without bottoming out in the throat.
- Repeat three times. Record the average. Inconsistent readings usually mean jaw play, a bent hook or worn adjustment threads.
Common mistakes are predictable. Technicians measure with jaws partly open, mix inch and millimetre readings on the same sheet, or treat a catalogue figure as verified. Don't. Measure the tool in hand.
The short video below shows the handling sequence before you apply the tolerance check.
Compare your readings with the supplier figure. Reject the wrench if readings differ by more than the manufacturer's stated tolerance, or the figure given in the governing standard's text. If neither states a tolerance, don't invent one. Ask for it in writing.
Standards Behind Pipe Wrench Dimensions
UAE buyers don't work to a single local pipe wrench size system. Catalogues cite international references, and that affects what you're comparing. The UAE pipe wrench catalogue listings identify DIN 5234, DIN ISO 8976 and ASME B107.10 among standards or approvals, while one 265 mm Stillson-style wrench is identified against US Norm GGG-W-651, Type I, Class B.
What Each Reference Signals
- DIN 5234: German and European dimensional and performance conventions for this tool family.
- DIN ISO 8976: A DIN ISO reference associated with European practice for adjustable gripping tools.
- ASME B107.10: United States practice for wrenches, cited in UAE listings.
- GGG-W-651, Type I, Class B: An older US norm cited against a specific Stillson-style model.
A catalogue label isn't the standard itself. Check the scope of the standard text before you rely on it for jaw profile, adjustment range, tooth geometry or rated use. Two wrenches with similar nominal lengths can differ on all four points.
Put four data points on every specification. Nominal size in inches, overall length in millimetres, jaw capacity in millimetres, and governing standard.
Ordering by label alone fails on mixed projects. If your team combines metric pipe dimensions with inch-based threaded fittings, both conventions need to appear on the order. I would not approve a purchase order that says only 18 inch heavy duty. It gives the supplier too much room to substitute a tool with the right length and the wrong jaw.
Matching Wrench Size to Pipe Diameter
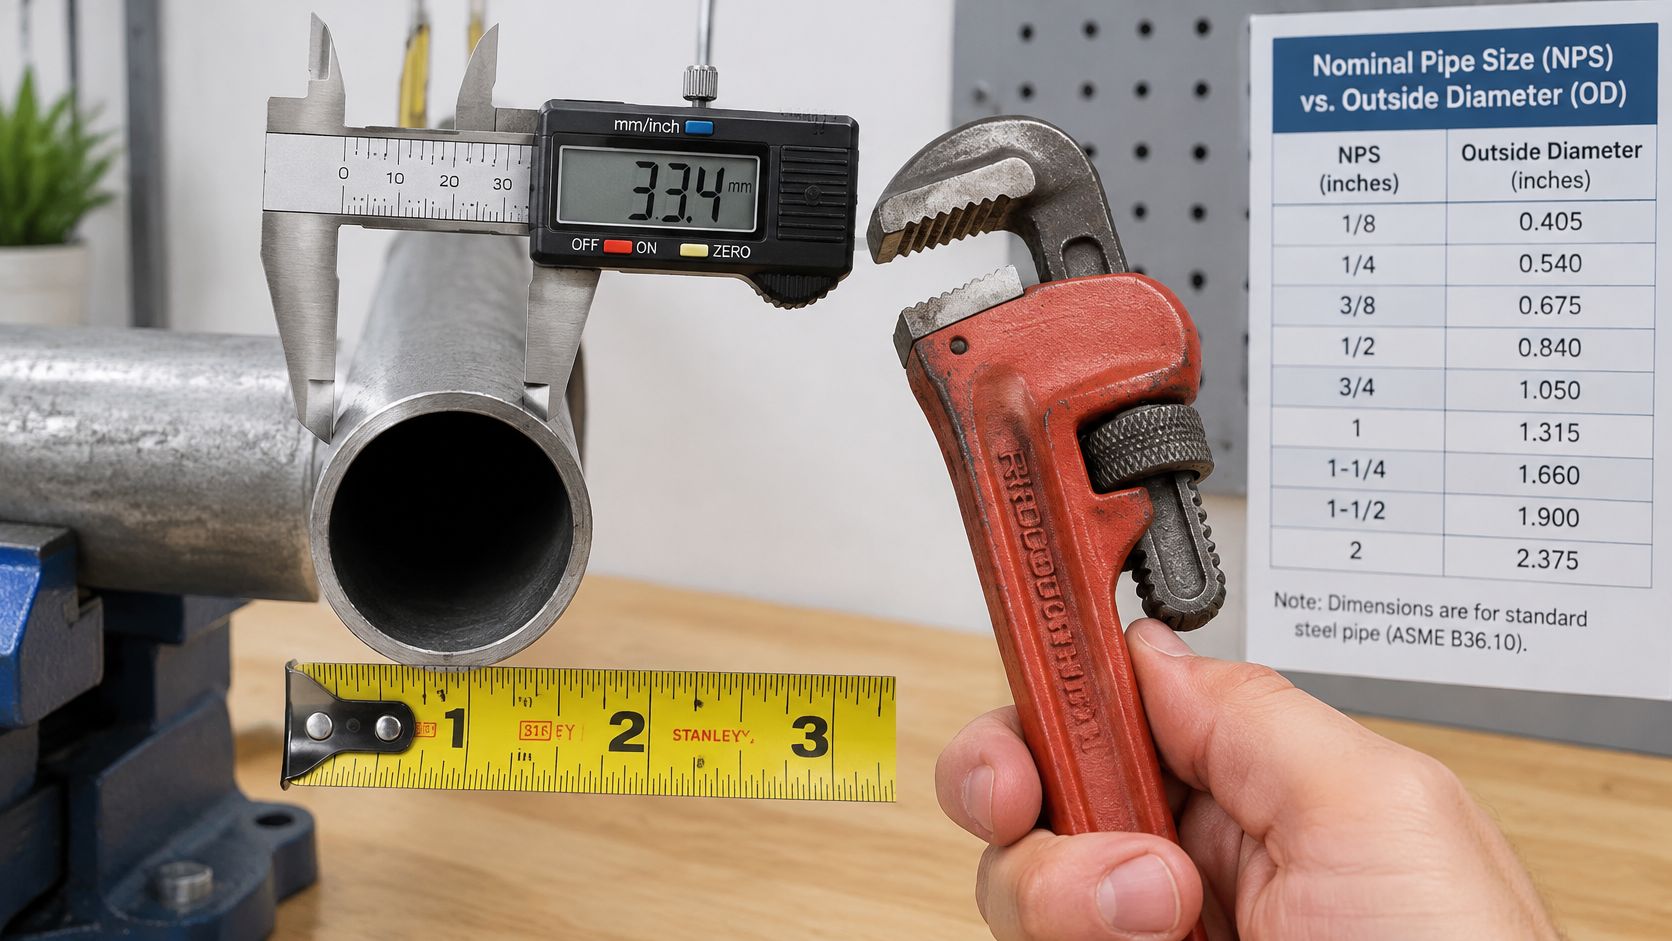
Start with the installed pipe, not the wrench label. For steel pipe, nominal pipe size sets a standard outside diameter rather than the bore, so measure the pipe as installed with a caliper. Then choose the smallest wrench whose jaw capacity exceeds that outside diameter by a clear margin, and check that handle length allows controlled turning.
The photo below shows the correct habit. Measure first, then select.
| Nominal pipe size | Suggested wrench | Practical note |
|---|---|---|
| NPS 1/2, 21.3 mm OD | 8 in (200 mm) | Small fittings; avoid overtightening threads |
| NPS 3/4, 26.7 mm OD | 10 in (250 mm) | Standard domestic plumbing |
| NPS 1, 33.4 mm OD | 10 in or 12 in (250 or 300 mm) | 12 in gives more leverage where access allows |
| NPS 1-1/4, 42.2 mm OD | 12 in (300 mm) | Check jaw capacity against the fitting |
| NPS 1-1/2, 48.3 mm OD | 14 in (350 mm) | Second wrench for counter-holding on joints |
| NPS 2, 60.3 mm OD | 14 in or 18 in (350 or 450 mm) | 18 in where access allows |
| NPS 2-1/2, 73.0 mm OD | 18 in (450 mm) | Use two wrenches on threaded joints |
| NPS 3, 88.9 mm OD | 18 in or larger (450 mm+) | Confirm jaw capacity of the model |
| NPS 4, 114.3 mm OD | 24 in (600 mm) or chain tong | Verify large-capacity model or use chain tong |
Cross-check your pipe figures against a detailed pipe size chart before you finalise the tool list. Remember that fittings are often larger than the pipe barrel. A union, elbow or valve body may need the next jaw size even when the pipe itself fits comfortably.
Maximum jaw opening isn't the same as a comfortable working range. At full extension, bite is poorer and the hook has less support. If a corroded joint sits at the limit of the jaw, move up a size or change tool type rather than forcing it.
Choosing by Pipe Material, Coating and Insulation
Jaw size alone won't save a finished surface. Serrated teeth bite hard enough to hold round steel, and that same bite scores galvanised zinc, marks copper and tears insulation jackets. Each mark becomes a corrosion point, a vapour barrier failure or a snagging defect at handover.
Dubai's green building requirements for consultants and contractors cover permanently installed plumbing components, require regular servicing and maintenance of MEP systems, and require insulation for hot-water, chilled-water, refrigerant and other relevant pipework. Specify pipe material, coating and insulation to the project's approved system requirements, then pick a tool that won't damage what you specified.
| Pipe or surface | Risk with serrated jaws | Safer approach |
|---|---|---|
| Bare black steel | Low; teeth mark the surface | Serrated wrench with correct jaw set |
| Galvanised steel | Scores the zinc layer | Padded jaws or strap wrench |
| Copper | Crushes and marks the soft wall | Strap wrench; limit torque |
| PPR and PVC | Deforms or cracks the wall | Strap or hand method; follow the jointing method |
| Coated or lined pipe | Chips epoxy or lining | Padded strap or pipe clamp |
| Insulated services | Tears jacket and vapour barrier | Remove insulation locally; allow extra clearance |
On insulated services, the dimension that matters is the jacketed outside diameter. Decide before buying whether the insulation comes off locally and gets reinstated after the joint, or whether a strap tool goes around the jacket. Gripping through insulation compresses it, loses bite and breaks the vapour seal.
Record four data points before ordering: bare pipe OD, jacketed OD where fitted, material and coating, and joint type. Match jaw capacity to the largest of the diameters and handle length to the torque the joint needs. A fusion-welded plastic joint, a threaded galvanised joint and a flanged coated spool don't need the same tool, even at the same diameter.
When a Longer Wrench Is the Wrong Choice
The longest wrench isn't automatically the best wrench. Extra handle length multiplies torque. On small or thin-wall work, that torque strips threads, deforms pipe, cracks cast fittings and overloads joints that were already correctly made. I've no objection to an 18 inch wrench on a heavy joint. I object to using it because it's the biggest tool in the van.
Length by Job Type
- Ceiling voids and shafts: Prefer 8 in to 12 in for access and short, controlled strokes.
- Plant-room maintenance on active lines: Use 12 in to 14 in with a second wrench for counter-holding, so torque doesn't travel through the run.
- Large mains and heavy threaded joints: Use 18 in or larger, but agree a torque approach first and support the pipe properly.
- Overhead or tight-clearance work: Choose a compact wrench or basin wrench. A long handle you can't swing is dead weight.
In dense MEP areas, clearance around the joint is often the limiting factor, not nominal pipe size. Parallel runs, cable tray, ductwork and insulated branches all steal swing space.
Run three checks before choosing length. Can the joint take a counter-hold? How much swing space exists behind the pipe? Is the fitting threaded or flanged? If it's flanged, you probably need spanners on the bolts, not a pipe wrench on the barrel.
Length rule: Use the shortest wrench that engages securely and gives controlled leverage.
Pipe Wrench Alternatives and Related Tools
Sometimes the right answer isn't a pipe wrench at all. Smooth jaws, straps and chains each solve a different dimensional problem, and each fails in a different way. Compare the limiting dimension before you compare price.
| Tool | Best fit | Dimension that limits it | Main risk |
|---|---|---|---|
| Pipe wrench | Steel pipe and fittings, about 1/2 in to 4 in | Jaw capacity and overall length | Marks and damages bare or coated surfaces |
| Adjustable crescent wrench | Nuts and small fittings up to about 1 in | Jaw opening | Slips on round pipe |
| Strap wrench | Plastic, copper, chrome and coated pipe | Strap length and pipe diameter | Limited torque on large joints |
| Basin wrench | Tight spaces behind basins and tanks | Reach of the long shaft | Not suited to pipe torque |
| Chain tong | Large pipe above about 4 in | Chain length | Heavy and marks the surface |
Switch tools mid-job when the surface or access changes. Break a corroded steel joint with a pipe wrench, then use a strap wrench on the replacement coated fitting. Use a crescent wrench on hex flats, not serrated jaws that round the corners. Use a chain tong when diameter exceeds jaw capacity, and accept that you'll need surface protection and more working room.
Don't use a pipe wrench on finished chrome, plastic or lined pipe to save a trip to the store. The teeth are designed to bite. They'll do exactly that.
If you're reviewing the wider cutting and gripping kit for a project, compare your selection logic with this guide to heavy-duty pipe cutters for site work. Cutters, straps and wrenches should be specified as a set around the same pipe diameters and materials, not bought as unrelated bargains.
Procurement, Inspection and Final Order Checks
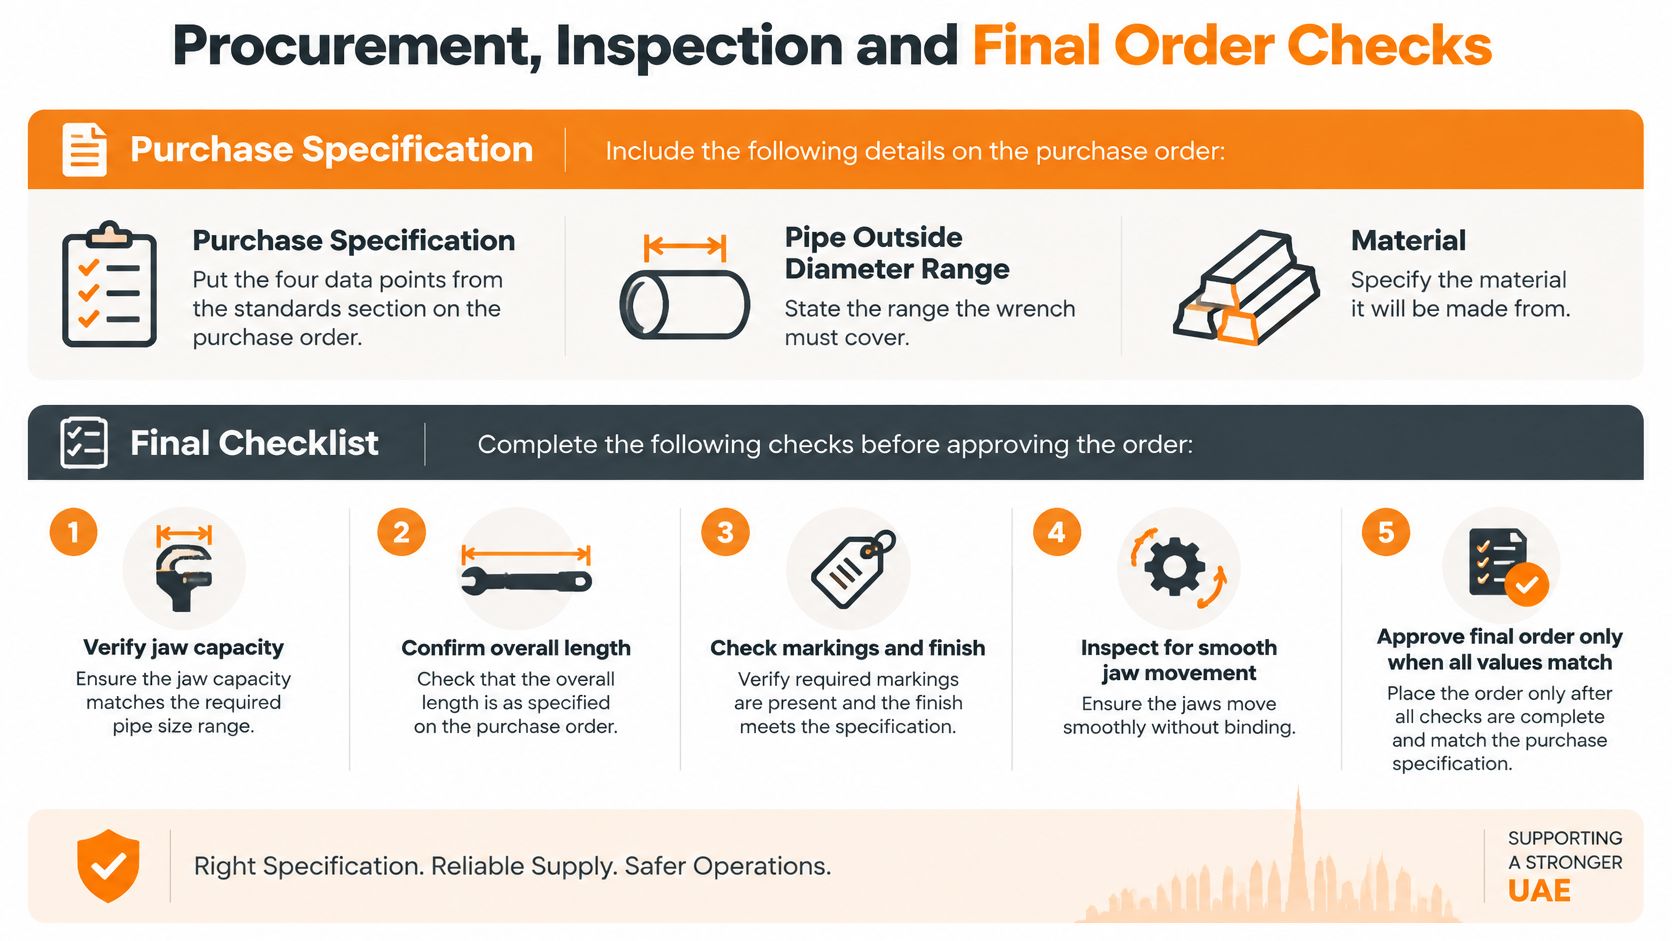
A purchase order for a pipe wrench should read like a joint specification, not a tool wish list. Put the four data points on it: jaw capacity, overall length, pipe outside diameter range and the pipe or surface material. Add insulation or coating where it changes clearance or jaw choice, and name the governing standard so a substituted model can be checked against something fixed. Use a general completeness prompt to check your procurement specification for gaps before issue if you want a second pass, but the order itself still has to answer what pipe, what surface and what standard; missing one of those is what invites the wrong wrench to arrive.
Consolidate a project's tools into one order where you can. It reduces site delays, avoids mixed standards across crews and makes spares easier to manage. Confirm the supplier can source the exact size and standard, and keep one spare for critical maintenance sizes. We stock Plumbing, Power Tools, Electrical, Fire Protection, Safety Gears, and Adhesive & Sealant under one roof in Deira, Dubai, which helps when a wrench order sits inside a larger MEP package.
Confirm warranty terms before first use. Full manufacturer warranty support is provided on all power tools and equipment, and hand tools should be checked under their own terms rather than assumed to carry the same cover. Our technical staff can give expert advice on product specifications, so use that check before ordering, not after a mismatch arrives on site.
On-Receipt Checklist
- Measure overall length and jaw capacity. Compare both figures against the order, in millimetres.
- Inspect jaw teeth. They should be sharp, even and free from chipped or flattened sections.
- Test the adjusting nut and pivot. Movement should be smooth, without side play or sticking.
- Check stamped markings. Size, standard and manufacturer marks must match the order.
- Record serial or batch number. File it with the delivery note for warranty and replacement traceability.
Follow the final order sequence in order. Identify pipe diameter and material, including insulation or coating. Pick the size from the diameter table and verify jaw capacity on the model. Confirm the standard, check access and swing space at the joint, then order and inspect on receipt.
Reject any wrench that fails a check. Don't put a questionable tool on a live joint and discover the defect under load. You can ask Yasu Trading Co. LLC to confirm a listed product against this specification before the order is placed.
Send us your pipe outside diameters, materials, insulation details and required standards, and we'll help you match jaw capacity and handle length to the actual joints on your project. Visit Yasu Trading Co. LLC to discuss your specification with our technical team and consolidate your plumbing and hand tool requirements into one checked order.